Who doesn't love Cake, besides my son (he does loves pie)? The March featured collection can be used to celebrate events, capture moments, and preserve memories with cards and scrapbook pages made using this month’s featured collection of products, Cake Day! I love ordering custom cakes for my kids and family members. So when CTMH decided to feature Cake Day for March, I knew I had some fabulous pictures to print. In that my newest, long over due, workshop was born. This collection is filled with vibrant colors from the CTMH rainbow: Wild Berry, Glacier, Green Apple, Lemonade, Sundance, White Daisy, Black.
My workshop creates 4 double page layouts or 8 pages using the Cake Day Scrapbooking stamp set, Cake Day Paper Packet + Sticker Sheet, Cake Day Coordinating Cardstock, Stencil Pack 2 (Stars overlay), White and black journaling pens, Inks and of course the Cake Day dots.
Layout 1: Hip * Hip Hooray
Layout 2: Surprise Party
Layout 3: Let's Party
Layout 4: I Lost Count
PRECUT KIT:
Option 1 - Basic Kit
Have the entire kit delivered right to your door from me, ready to assemble. Your kit will include all the bases pages needed, all pattern and card stocks paper precut and a full 12x12 sticker sheet. The very basics for you to create and style your pages to suit your needs, and a full color PDF assembly guide (not a cutting guide) *While supplies last
Order your kit HERE for $40, please put in the subject line Cake Day Basic Kit, and then I will send you an invoice. Turn around time is about 2-3 weeks to order the product and cut the kit. They MUST be paid before they get cut.
Are You a VIP Customer of MINE? If so, I will make sure you earn your 15% on the product costs. Not a VIP customer? Scroll to the end to learn more about becoming a VIP Customer.
Option 2 - Basic Kit +
Have the entire kit delivered right to your door from me, ready to assemble. Your kit will include all the bases pages needed, all pattern and card stocks paper precut, a full 12x12 sticker sheet, a full package of Cake Day Dots, all stamping and stenciling will be done for you, and a full color PDF assembly guide (not a cutting guide) *While supplies last
Order your kit HERE for $65.00, please put Cake Day Basic+ Kit in the subject line, and then I will send you an invoice. Turn around time is about 2-3 weeks to order the product and cut the kit. They MUST be paid before they get cut
Are You a VIP Customer of MINE? If so, I will make sure you earn your 15% on the product costs. Not a VIP customer? Scroll to the end to learn more about becoming a VIP Customer.
Option 3: GET IT ALL
Have the entire kit delivered right to your door from me, ready to stamp and assemble. Your kit will include all the bases pages needed, all pattern and card stocks paper precut. a full 12x12 sticker sheet, a full package of Cake Day Dots, a full package of Stencil Pack #2 and the super cute and fun Cake Day scrapbooking stamp+ thin cut, and a full color PDF assembly guide (not a cutting guide) *While supplies last
Order your kit HERE for $90, please put in the subject line Cake Day Get It All Kit, and then I will send you an invoice. Turn around time is about 2-3 weeks to order the product and cut the kit. They MUST be paid before they get cut.
Are You a VIP Customer of MINE? If so, I will make sure you earn your 15% on the product costs. Not a VIP customer? Scroll to the end to learn more about becoming a VIP Customer.
Be a VIP!
The VIP Customer Program is your chance to earn shopping credit on your purchases while getting access to exclusive product and perks!
Check out the exclusive kit only VIP customers are able to purchase.
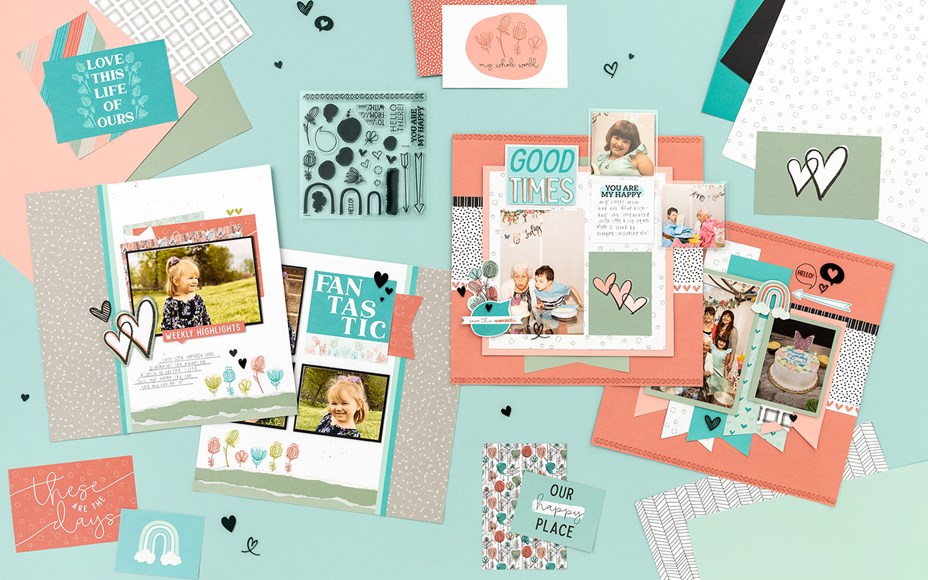
The VIP Highlights workshop kit includes the exclusive Highlights Picture My Life™ cards and My Acrylix® Highlights stamp set, together with a selection of cardstocks, mix-in papers, acrylic hearts, and Memory Protectors™, including Flips Flaps™ and Pocket Plus™ protectors. The workshop instructions show you how to use these materials to create a set of three 2-page 12″ × 12″ scrapbook layouts, including some with Flip Flaps and Pocket Plus add-ons.
This weeks course is focusing on cards and cocktails that start with the letter F - If this is your first time here, welcome! I am offering a 26 week course (via my Facebook page) where I work my way through the Alphabet making cards that start with that weeks letter. This week is Four Panel Card (sometimes called the quarter fold - I won't double-dip PROMISE). This weeks drink; how about a Fuzzy Navel - I have never had one, but they sound delicious.
I have been picking rather simple card folds, because if you are like me, time is valuable and I need cards that are quick, stunning, and easy. As a mom to 4 kiddos, who homeschools, is heavily involved with scouts, and works part-time from home, life can be crazy! Just because a card is easy to make, doesn't mean it cannot be stunning.
You can catch this weeks course replay below. Measurements and supplies for this particular card are noted at the end of this post.
If the video doesn't play - Click HERE you will be redirected to my Facebook Page DanYellScraps.
I loved the layered flowers used on this card! It is on the bulky side so, if you do decided to go this route make sure you are prepared to pay for extra postage when mailing.
I simply love how the leaf hangs off the edge on the front panel.
This weeks Drink is a Fuzzy Navel - I have never had one, and thought this would be a fun drink to try on date night. I saw that it can be made with Peach Schnapps and orange juice, and some people even us lemonade and a splash of vodka. Sounds like a fun treat!
Be sure to catch the entire course by heading over to DanYellScraps on Facebook, click going under classes for the Cocktails and Cards! See you next Thursday at 7pm eastern!
Measurements:
Cards stock:
5.5 x 11 Scored at 1/4, 3 3/4, and 7 1/4
You will need to trim 5/8 off one side of this after scoring. Line the left side of the panel up at the 5/8 mark, with the 1/4 scored mark at the top of your trimmer. Then cut until you hit the very last score mark. then cut this small section off. If you are visual person like me, check out the video above.
(1) 2 3/4 x 4 1/4 (Front panel that will be tacked on later)
(2) 2 1/2 x 4 (Front panel-front and back side.)
(2) 3 1/4 x 4 3/4 (Two inside panels)
(1) 4 x 5 1/4 (back panel)
Pattern Paper: (note I used white daisy cardstock on my cards)
(1) 2 3/4 x 4 1/4 (Front panel that will be tacked on later)
It's the Technique Blog Hop, let's talk about a stencils!
Stencils can be used with so many different mediums. Today I am using my 12x12 circle stencil with distress oxide inks. The final project was cut to fit a card. If you have you arrived here from Wendy Kessler's blog you are in the right spot! Wasn't her project so cute! If you are starting here, perfect, you can follow the link below to the next hop.
I am so giddy with how cute these cards turned out. I love to scrapbook, so my purchase of the Stencil pack #2 from close to my heart was only being used for pages. It dawned on me that I could create an entire page with this stencil, and trim it down into card panels to create cards.
I even created a little video of my process! If you watch it, you will see what I do with my stencil before cleaning it off!
Here are few close up's of the cards I made! I hope I have inspired you to be creative with stencils, and think outside of the box when it comes to using 12x12 stencils for cards.
Now it is time to hop on over to Michelle Johns' Blog. She has another creative project you will surely be inspired by!
This week on Cocktails and Cards we focuses on the letter D! So that means Double Z-Fold Card and a Daiquiri. Now in my C&C course I don't actually make or have a drink, I simply share a recipe of said drink.
Double Z-Fold Card
So the Double Z-Fold has to be one of the top 10 simplest card folds I have made. Once you have your score marks figured out, there are so many possibilities on how this card presents it's self.
Watch the replay of this live tutorial below or Click HERE if the video isn't working.
Look how this folds flat for mailing. Tip - the more layers you add, the chance you run of extra postage needed. Rule of thumb to help gage is if your completed card inside an envelop can fit in the opening slot of your Fiskars paper trimmer, (this is the paper trimmer I have) you are most likely okay to mail without extra postage.
Here you get a nice view of the Double Z's that are created when putting the two folds together.
See the slight variation of the center piece? this care is so EASY to customize. You can make this piece as tall as the top card, slightly shorter like the bottom card, or even shorter for a more pronounced look. I say let your creativity run wild. To make this work, your score marks should compliment each other on the two pieces.
Like any card front, the design is left to your theme, paper choice (busy, subtle, etc.), and creativity. You can see on both cards, due to my busy background, I opted for a simple card front.
The inside of the first card, holds a sweet girl stamp from the CTMH Besties stamp series - Kelsie. This is a card for my daughter who loves this stamp set. Otherwise you would reserve this space to hand write, or stamp your heartfelt message. I will use the back of the card!
I really hope you enjoyed todays creative session! Join me each Thursday LIVE at 7pm eastern on my Facebook Business page, to catch this series. I follow the alphabet - and this next card will be based on the letter E.
Measurements:
Cardstock:
Base: 4.25 x 11 --- score at 2.75 and 5.50
Top fold: 3 x 9.75 --- score at 2.75 and 5.50
White Daisy: 2.5 x 2.75
Pattern Paper:
Base: 4 x 5.25, 2.5 x 4 (you will need of these cut)
Top Fold: 2.5 x 2.75, 2.75 x 4
Scrap cardstock, white daisy etc. for embellishing the front/inside etc.
Stamp sets used: S2202E (February Stamp of the Month), Z3982 Party Gnomes (includes thin cut), Z3938 Besties - Kelsie (includes thin cut)
Today's coordinating drink is the Daiquiri (Strawberry)
You can enjoy this with or without the rum (I am not big drinker, so without would be fine for me)
This makes 8 servings! You will want a blender, about 6 cups of ice, 1/2 cup sugar, 4 oz of FROZEN strawberries, 1/8 cup of lime juice, 1/2 cup of lemon juice, 3/4 cup of rum (optional), 1/4 cup lemon-lime flavored carbonated beverage.
I have something amazing I want to share with you all!
Together with Pauline Teahan and Michelle Johns, we have created LFTC!
🦩Let’s Flock Together Circle
The original Let’s Flock Together was born in a time where people had a TON of time newly on their schedule. We were all about the ‘let’s show them how to do this’ mindset. We still are! With the world opening back up again, we wanted to introduce something that was a bit easier to take with you. That is how LFTC was born. With LFTC, you will get 6-12 tutorials, with videos, and a PDF with measurements and photos. These tutorials will be something that will be exclusive to the LFTC!
Here is a sneak peek at February's projects.
You will also have access to our FREE Facebook group Let's Flock Together where we share weekly scrapbooking prompts, Tip Tuesday videos, and share artwork. A true community of crafters who are creative, kind, and fun!
To learn more about LFTC and what it has to offer head on over to our website: HERE
I have been creating slimline cards a lot more lately. In January I created a Slimline card workshop that creates 48 cards. There are 4 cute designs from which you will create 12 cards each. I hosted two classes, one in-person and one virtual, after those two classes, I ended up with a small selection of pre-cut kits left in stock!
Here are the cards:
How do you get your hands on a kit or the workshop?
You can get the workshop (PDF) guide free when you shop with me via my personal shopping link DanYellScraps Purchase the supplies I have listed or $25.00 before shipping and tax. I will email the PDF to you directly! This is a virtual file and does not include any physical items.
You can purchase a Pre-cut Kit for $18.00 USD for porch pick up if you are local, or $23.00 for a mailed kit. Use the PayPal below.
Spend $150.00 with me, and received the Prepaid Kit for Free, along with PDF guide to create more Slimline cards -> If you choose this option contact me about our VIP Program you will earn $22.50 in CTMH cash to use on future order plus $15.00 just for signing up.
If you are fellow CTMH Maker - message me for a personal invoice for just the guides $12.00 ea
Today, is the third installment of Cocktails and Cards on my Facebook page DANYELLSCRAPS
If your new here no worries! Each Thursday I make a card and share a cocktail following the alphabet. This week I did letter C, a Criss Cross Slimline.
This card was so easy! I encourage you to watch the tutorial here: Criss Cross Slimline
As promised on my video, here are the measurements/template.
1 base cut at 8.5x10.5 scored at 3.5 and 7. Measure 1 3/8 from the bottom, make a tick mark. Cut on a diagonal from your tick mark to the top of your car stopping at the score line. Do this on each outer flap.
For the inside, you'll need 3 pieces of pattern paper cut to 3x8. Two pieces will be cut at an angle similar to the flaps. Make a tick mark at 1 3/8 from the bottom and cut diagonally to the top inside corner. The template shown, marks which piece goes where. And technically they are not in the correct order as pictured. :) Watch the orientation of your design with this also.
I decorated my card with the new layering thin cuts from Close to My Heart.
I used the exclusive stamp set from the Sweet as Honey cardmaking workshop.
The layers are cardstock cut from Sundance, Shortbread and Rosemary colors.
I hope you enjoyed this fun little class. See you next week, live on Facebook.
It's the last Tuesday of the month! Nothing too special about that, except it is the day I go over how to level up your cards!
If you're not following me on Facebook, head to DanyellScraps now and check out all of my classes. They are free, fun, and usually quick (hey I talk fast)
We started with a basic card, and created exactly like the sketch. This is a super sweet, simple and darling card.
For our second card, we leveled it up, by adding some ribbon, sequins, die-cuts, and popping up our images. Super cute and took hardly any time at all.
Our third card is our show-stopper! We did everything from the first two cards, and added a few elements.
Stenciling, blending, matting. Dry Embossing, and shimmer trim.
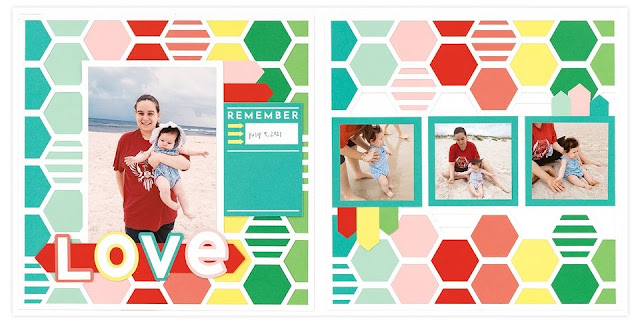
I am excited to show you my layouts from using scraps!
Sweet as Honey cardmaking workshop scraps were used to make this layout.
After I cut all the pieces to make 16 cards, I used the scraps to create this beautiful layout!
The center piece is rosemary cardstock and cut at 9.75 x 3.25. I filled it with three 3x3 photos. The dovetail banners were all scrap pieces tucked behind the photo matte.
The base is 12x12 rosemary cardstock with a 11.75x11.75 white daisy matting.
Stenciling was done in saffron and rosemary inks, then lightly inked over with a sponge to blend the color and take the stark of the white daisy out.
(Cartoon bees on the picture are to cover up details about my daughter, and not part of the kit)
Wait, I have another page I did, using the smitten collection scraps.
So after I created 48 slimline cards, I had some pieces left over, and it was plenty to create this same layout with a bigger focal picture.
The base page is a nectarine cardstock in 12x12. Topped with a 11.5 x 11.5 white daisy cardstock.
The photo matting is a 5x7 Raspberry, with a 4.25x6.25 black cardstock matting. This will hold an adorable picture of a new coffee mug I received for mother's day a couple of years ago.
I used the same concept as the above layout by cutting scraps into a dovetails and tucking them behind the photo matting. I layered some left over stickers from the smitten collection, and tucked them also.
This cute little Llama's sign said "hug your Llama" and I changed it up by adding a cute coffee cup on top of the writing to match my picture (that needs printing- don't come for me 🤣)
I hope you have enjoyed today's post!
Danielle
***All supplies used were from my shopping site via Close to My Heart found HERE I use an ATG pink gun for my adhesive. I purchase my adhesive in bulk from Amazon. Check out my favorite things from AMAZON with links on the right hand side. I do receive a small commission when you shop from any of my Amazon links (like pennies).
Welcome to the technique blog hop. We are talking about geometrical shapes and implementing them onto our projects with purpose.
If you arrived here from Darlys Recker's blog, you are in the right spot.
My technique was very simple, inks and daubers.
I am a super busy mom, and wanted to show easy this style can be adapted without the need of a paper trimmer, die cutting machine, stamps or even blocks.
I started by lightly inking up my blending tool. Using a light hand, I twisted the ink on my white daisy cardstock. I choose 5 colors and repeated this process for each color.
Next, I took a finger dauber and inked it up well, and applied a good amount of pressure to make a smaller circle inside the larger circle of corresponding color.
You can see a nice close up of that here.
I added a thin cut sentiment (sending hugs left over from a previous project) which was cut 3 times from black cardstock and layered.
I also wondered what this would look like if the distress oxide inks were activated, with water? A much softer look and feel. Same technique to apply the ink and with a little manipulation from water, a completely different look and feel.
I added a sticker from the smitten collection with 3D foam tape, drew a doodle border and stamped tiny hearts along the way.
I love both cards for different reasons.
Now head on over to Tamara Sandwisch blog to see her interpretation of let's get geometrical. Before you go, I'd love to hear what you think about my technique/cards in the comments.