12/31/2016

Turning Scraps into Thank you's!

Christmas Thank you's!

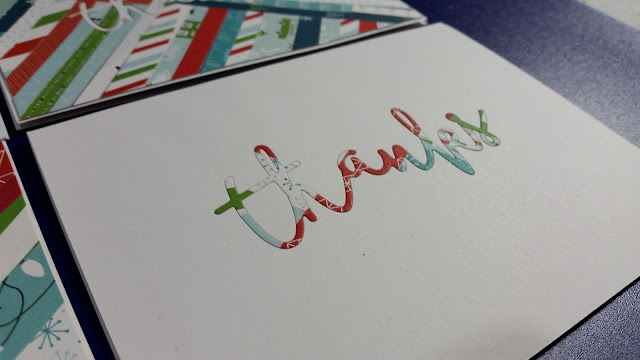
I have lots of family outside of the state, that love to send my little's gifts, especially at Christmas time. After completing my City Sidewalks Christmas Buffet, (linked to my post) I had lot's of scraps to play with.
While I didn't need anymore Christmas Cards, I thought about the Thank you's that should be sent out...While Watching a Jennifer McGuire video on You Tube, I was inspired to create in lays using my CTMH "Thanks" Thin Cut Die.

My Favorite thing to do with scraps is to create the herringbone technique. (check out the video in my June 2016 post)

Using my Thanks thin cut die, I cut out thanks, from my herringbone creation. I saved all the little pieces from the letters to put back.


 I also cut thanks from a white daisy 4.25 x 5.5 card stock, again saving all the little pieces to put back.

I swapped the thanks from each cut out, and placed them in the negatives spaces. Remember, to add the tiny pieces from the letters back in...these came from the space between the "T" and "H", the "K" and "S". the pieces from the herringbone stay with the herringbone, and the pieces from the white daisy stay with the white daisy.

Such simple and easy cards, that you can recreate from any scraps you have.

Here are 4 of the many cards created using this inlay technique.


Thanks for stopping by! I hope you have been inspired to get creative with your crafty tools! 

Here is a list of items used to create these cards, please note, i am compensated with a commission with purchases from the links below. For that I THANK YOU! :)

Have a Scrappy Happy Day!
DanYell Scraps 

Shower Flowers Invite!

Bridal Shower Invite...with Shower Flower Stamp Set!

I am so excited to share with you this invite. Browsing through my Annual Inspirations Idea Book, I found the most adorable invite found on page 40. I just had to scraplift this card. So using my favorite shades of purple, I sat down and whipped this quick invite duplicate out....lets take a look at what supplies I used and a step by step picture tutorial!

Just a few items to get going.
  • Shower flower stamp set
  • Arcylic blocks
  • scissors
  • foam tape
  • shimmer trim
  • Card Stock
  • grid ruler
  • water base inks
  • scrubber pads
  • bone folder
  • shimmer brush
  • journaling pen
  • pigment ink (white)
  • Gold Embossing powder (not pictured)
  • ribbon
 Using my grid ruler, I took into account where the information needed to be stamped. As the top would have title and the bottom would have an assortment of flowers.

 Not an exact measurement, I aimed for about 2 in from the top and bottom.

 Here I am playing with the placement of my flower arrangement, I want it to curve slightly. I have my stamps faced down so there is a true idea of what it will look like.


Start with the succulents stamped in a whisper ink, then add the small pansy flowers in thistle ink. 

Fussy cutting time, the tulips were stamped in a eggplant, using a second generation stamping to achieve the lighter color. The bigger flowers, were stamped in pansy ink. As you can see to give added depth, the center of one flower was fussy cut, while the center of the other was stamped directly on the flower in the eggplant second generation stamping. 

 Add some 3D foam tape to the bigger flowers.
 Look at how cute this arrangement came together! (I ended up moving the flowers around just a bit so the smaller flowers were more visible)


For the title of the invite, I used white daisy card stock, It's a Shower stamp, and black ink.

 To make sure the stamp was straight, I placed it on my paper then proceeded to place my block over it. Sometimes i find when I place my stamp directly on the block, it make be curved. (I did this in the beginning of the invite process, and you can see my info stamps already adhered to the block. I had them arranged perfectly, rather than reach over and grab another block, I just used the opposite side. The beauty of clear blocks.

Something that has taken me a little bit to achieve in my stamping skills, is pressure. Too light and the image needs re stamped. To heavy and the image becomes blurred. I practiced a few times on scrap before I achieved the right look. Those foam sheets you find in your acrylic stamp sets, those have a purpose, they truly help you accomplish a clear, crisp, clean image. If you are not using them, and finding it hard to get the desired stamping results, try using them the next time you stamp.

 Using my title as a guide, I placed my shimmer trim pieces.

 The shimmer trim, really gave this some much needed sass.
Layering time...while the invite would serve it's intended purpose as is, the layers give it the sturdiness it needs and gives it the finished look I desired. The 5x7 card stock is the from the whimsy fundamentals collection, and the glacier card stock, is measured at 4.5 x 6.5

 Using extra wide foam tape from my stash, I have placed the 4.25 x 6.25 white daisy on the glacier cardstock.
Time for some bling!!! I really wanted to tie in the shine from the shimmer trim into the rest of the card. So, using some purple glitter gems from my stash, and the CTMH Shimmer brush, I went to town blinging (that's not a real word, but lets pretend for today)  this card out. 

Just look at how stunning the flowers are with the added shimmer from the shimmer brush! The purple gems, were a perfect fit to the small background flowers!

The card on the left was my practice run! As with all practice runs, we take note on things we'd do different. While the first run, is just fine as is, I decided to give the second run and upgrade... Here is what I did different with my second run
  • Reduced the amount of small background flowers
  • Moved gems to the center of the background flowers, from being randomly placed.
  • flipped the ink colors on the tulips with the main focus flowers. 
  • used second generation stamping with the eggplant ink, to give a better flow of like colors. 
  • Swapped the whisper card stock out for shimmer trim behind the title. 
  • Moved down the invite information for better placement and flow of the invite.
I really hope you enjoyed today's Shower Flowers stamp show case. 
Below you will see a list items I used, please note any purchases made through the links, will help me earn a commission and incentive trips through close to my heart. For that, I thank you

12/30/2016

Balloon Wishes

Balloon Wishes...Welcome Baby Card!

Featuring Balloon Wishes Stamp set!


While on a much needed 9-5 vacation, I have been crafting my heart out...well as much as the small people will allow. :)

This card was inspired by an upcoming baby shower, with inspiration from our current Annual Inspirations Idea Book, see page 42.


This turned out to be a 4.25 x 5.5 card. I used the Balloon Wishes Stamp set, which includes 8 stamps. 
I stamped the balloon in the beautiful Sea Glass Color of the year, exclusive pigment ink. I then heat embossed the image using Ranger Clear Super Fine embossing powder. This made such a difference in the appearance of the balloon. 
Using my Shin Han markers in Lavender and Tender pink, I added some bits of color to the flag, basket and balloon details. By applying ink directly to my colorless blender pen, i was able to lighten the lavender and tender pink to give a softer look. You can see this detail below.

Using some purple glitter gems from my stash, I added a line of dimension to the balloon top. (I love all shades of purple and tend to use it in most of my work when I can)
To finish up my stamping, I stamped the Welcome Baby in Whisper ink, and then I fussy cut the Welcome Baby banner. On a side note this stamp set coordinates with the Artiste Cricut Cartridge. I could have easily had this banner cut from there also. 
Adding some polka dot ribbon from the whimsy ribbon pack, complete with a bow, really gave this card the extra pop it needed.
To finish this card, I adhered the 4 x 5.25 white daisy card stock to a 4.25 x 5.5 thistle card stock. Using 3D foam tape, these two panels were added to my 4.25 x 5.5 card base.

Thanks for stopping by, I hope you enjoyed my creation today, show casing the adorable Balloon Wishes stamp set. Below is a list of materials I used and a link on where you can get them too.

Have a Happy Scrappy Day!
DanYell Scraps


I will receive a small commission for items purchased through the links from DanYellScraps.CTMH.com
THANK YOU! :)

12/21/2016

New Thin Cuts!!!

Love our Thin Cuts? 

Then you’re going to love this special, limited-time offer! 


We now have coordinating Thin Cuts for the following stamps sets found in our Annual Inspirations idea book:


  • My Acrylix® Swirly Seashells (C1664), 
  • My Acrylix® Sweet Birthday (B1532), 
  • My Acrylix® Wreath (A1193),
  • My Acrylix® School Kids (D1706). 

These Thin Cuts are sure to go fast, so place your order today!

A Closer Look

Use these thin metal dies and your favorite die-cutting machine to quickly and easily cut the shapes shown here. Thin Cuts are packaged on their own magnetic sheet and work well with most die-cutting machines. Stamp sets sold separately.


Thin Cuts—School Kids

  • My Acrylix® School Kids (D1706).

Coordinates with the My Acrylix® School Kids stamp set (D1706)


Thin Cuts—Wreath

 
My Acrylix® Wreath (A1193)

Coordinates with the My Acrylix® Wreath stamp set (A1193)


Thin Cuts—Sweet Birthday

My Acrylix® Sweet Birthday (B1532)

Coordinates with the My Acrylix® Sweet Birthday stamp set (B1532)


Thin Cuts—Swirly Seashells

My Acrylix® Swirly Seashells (C1664)

Coordinates with the My Acrylix® Swirly Seashells stamp set (C1664)


Dates: valid through July 2017, while supplies last.

Thanks for Checking out the new thin cuts.

DanYell Scraps

12/18/2016

Planners Gonna Plan....

Hello Crafty Peeps!

Are you a planner? Love the new coloring craze? ME TOO!

Discover your inner artist while staying on top of your schedule with our new 2017 planner system. Featuring seasonal designs you can color by hand, this exclusive planner system combines the worlds of work and play to give you a planner you can truly make your own.


Choose a bundle:
The Everyday Life™ Sea Glass


The stripes album,

or
purchase just the planner pages if you already have an album—the choice is up to you!


Get your planner today, because this planner system is only available while supplies last!


Dates: Offer valid whiles supplies last

1. What are the benefits of the Planners Gonna Plan Everyday Life™ planner bundles? These bundles allow you to get all of the basics for your 2017 planners by using one quick click to add them to your shopping cart! The planner bundles include either the Everyday Life™ Sea Glass album or the Everyday Life stripes album, as well as the planner pages. These planner pages come with monthly calendars (Sunday through Saturday), weekly calendars (Monday through Sunday), 12 pages for notes and journaling, a clear pencil bag, and three gold paperclips. 

2. Other items I recommend you to order along with Everyday Life™ planner bundles.. These planner pages have been specifically designed for you to express your creativity through coloring! Items that make great additions include the following:


We have designed the divider pages of the planner (pages with tabs) so they have thicker paper, which will allow you to use of a variety of products when coloring. Here are the different products you can use on the dividers:

• ShinHan™ Touch Twin™ markers 
• Watercolor pencils (dry or with a waterbrush) 
• Exclusive Inks™ stamp pads (pressing ink into lid and picking up with a waterbrush)
• Watercolor paints (used with a waterbrush or paintbrush)

Please note: Although the planner is not made with watercolor paper, you can use watercolors on these pages; however, we recommend using paint with very little water for best results.  


The planner pages themselves, including the “remember” pages, are made of paper that is more lightweight paper than the dividers—but you can certainly color them! For best results, here are the products we recommend on these pages:
• Watercolor pencils (dry) 
• Clear shimmer brush 
• Metallics markers 
• Marvy® Uchida® LePen™ journaling pen 
• Exclusive Inks™ stamp pad 
Please note: Although you can use ink from our stamp pads on these pages, we recommend using smaller stamp images and lighter colors for best results. We do not recommend using our pigment inks.   

Don’t forget that you can add our Everyday Life™ Memory Protectors™ to your planners as well! These protectors are great for adding photos of loved ones or just for more customization. 

3. Should I color the Sea Glass designs found on the weekly calendars?
No. These designs are simply for decoration. However, feel free to embellish them or add shimmer using the clear shimmer brush. 

4. Check out this video for an action presentation: 


5. How long will the planner be available? While supplies last, so be sure to submit your customers orders as soon as possible --->Get it NOW!

6. Dont forget the hashtag... A hashtag is the pound sign (#) followed by a word or phrase with no spaces.  Using a hashtag in social media (ex: Twitter, Facebook, Instagram, Pinterest, etc.) helps make your post searchable. The hashtag for our planners is #plannersgonnaplan. Be sure to share all of your planner art on social medial using the hashtag!

Thanks for Stopping by - I can't wait to see your planners!
DanYell Scraps!

12/03/2016

City Sidewalks Christmas greetings collection

Hello my Scrappy Happy Friends!

I am so excited to share with you my cards from my card buffet... first here is what my crafty ladies did...


and what I have created with the left overs.


This beautiful set of cards with a card folio, is perfect for sending out Christmas greetings to those extra special people in your life...


This set of 6 Christmas cards and envelopes,  is made using the CTMH city Sidewalks paper packet, and PML cards.


This set includes:
Two of the quilt patterned "Merry Christmas" cards. With "We're wishing you a Christmas filled with the warmth of family,  friends, and fun!" Sentiment stamped inside.

Two of the "may all you Christmases be bright" with hand embossed star cards. Blank inside.

One Christmas presents with fussy cut bows and shimmer added card. With "a heartfelt Christmas wish of peace and happiness this holiday season" stamped inside.

One "Wishing you Peace, Love, & Joy this Christmas season" card. Blank inside.

Six envelopes.

One card folio to kept your cards in one place.

Each card measures 4.25 x 5.5

Materials used:
Non-CTMH products from my stash...
White rickrak
Red 1/4" silk ribbon
Red eyelets
Silver snowflake brad
Teal snowflake ribbon

CTMH products
(Which can be order from my CTMH website, 24/7 at www.Danyellscraps.ctmh.com .)

City Sidewalks paper packet x7213b 12 - 12×12 B&T papers, 2 of each of 6 designs retires 12/31/2016

Cranberry card stock 1272
24 sheets -12×12 (unique white-core cardstock)

Red shimmer trim Z1848 adhesive backed, 5 yard 3/8" wide per spool.

Silver foil tape Z3130 shiny foil tape, 15 yards, 1/4" wide per spool

Blue dots Z3122 adhesive backed enamel pieces. 8mm and 6mm

Shimmer brush - Clear Z3293
Used to add shimmer to artwork.

Very merry set of 9 stamp set D1694S - "Wishing you Peace, Love, & Joy this Christmas season",  " Merry Christmas", "May all your Christmases be bright" retires 12/31/2016

Jolly Holiday set of 8 stamp set. Coordinating with the artistry cricut cartridge. Used for the presents and the bow. Retires 12/31/2016

Retired gold twine.

Retired October STOM
Yuletide Joy set of 7 featuring the embossed star.

Thanks for stopping by and check out my project. if you are interested in purchasing a completed city sidewalks card-folio, check out my Etsy shop with 4 styles to choose from.

SHOP My Etsy Page here!

Have a happy scrappy day!
Danielle .