1/31/2020

3D Project Friday|Mini pizza box

It's finally Friday!

The weekend is here and in our house we do pizza, and somehow this has trickled into my craft room...well in the form of inspiration. 

Check out this adorable 3D project using a mini pizza box theme. I have taken my box to a different level and created a peek-a-boo shaker window. I am back with my crafty friend michelle and as we nail it on another 3D project, so make sure you hop over to her blog to see her pizza box. 
This week my project includes a video! 


Supplies used: 

Thank you for stopping by! 
Danielle


1/29/2020

Sketch it Out Wednesday

Its Wednesday and if you've been following along, you know that it's another sketch challenge for a 6x8 mini layout page.

If you are new to my page, WeLcOme! My crafty buddy Michelle and I have been challenging ourselves to create a new mini layout page in a 6x8 inch size every Wednesday. This week Michelle thought it would be neat to sketch out a pocket page idea. Welp, I dont have any pocket pages for the 6x8 size, so it will be pretty interesting to see what I come up with, and what she does! We try not to share our works with each other until our posts go live, so be sure to hop over to Michelle's blog after you leave here, if you have not already been there. 

Check out the previous weeks sketch challenges here.... January 8th, January 15th, January 22nd

I started with a 12" x 12" White Daisy cardstock base cut down to 6" wide by 8' tall. I imagined the top portion of my page was a 4"x 6" pocket with the bottom half as two 3" x 4" pockets.
My stash included a set of the picture my life pocket cards (PERFECT size for this challenge) that has 24 double-sided pocket cards featuring unique designs, sentiments, and icons. This collection has a winter outdoor theme. The colors in this collection are Sangria, Fern, New England Ivy, Julep, Espresso, Mink, Linen, French Vanilla and pair so well together.

I thought the winter woods scene was great, however I wanted a more muted tone to it. Now I could have taken white daisy pigment ink and gave it a white wash, instead I used a vellum sheet cut down to 4" x 6" I adhered a photo placement in the 3" x 4" size to the right of the page, and under this is where the adhesive is hidden that holds the vellum down. 

My new favorite stamp is Quotable Words from the Story by Stacy collection. To enhance the photo, I stamped "The most treasured heirlooms are the sweet memories of family" in sangria ink. This stamp set absolutely nails it as staple set for any ones collection. It has 13 images, and will work for all sizes of pages and even is adaptable to cards. 


This turned out to be such an adorable layout, simple, fresh and clean! Now hop on over to Michelles' blog to see here pocket sketch creation! How do you comes up with fresh ideas for your mini album pocket pages? 

Thanks for stopping by. 
Danielle

1/22/2020

Mini Album|Sketch Wednesday

Happy Wednesday! 

So if you have been following me these last couple of weeks, you know that on Wednesday's my crafty friend Mischelle and I show off a mini layout from a sketch. So, this weeks layout isn't from a sketch really, it's from the Artbooking Close to My Heart cricut cartridge. Once you're done checking out my project, head on over to Michelle's blog to see her version of this layout. 

I used the 6X8 Snapshots Mini Album Page #MA910A, sized to 6 inches wide. I was left with 3 base base pages, two 3x3 photo mattes, one medallion, one heart cut out, one film strip, 2 honeycomb style backdrops, and two titles.  


For this page, I stilted the background (bluebird cardstock) off the edge, I added white daisy to the back of the sentient " Oh Snap' (Sorbet cardstock) and the photo mattes (willow cardstock). I found this more pleasing to the eye since I didn't have pictures to add at the moment. 


Obviously two of the base pages were white daisy, the third (cut in raspberry) you can see peaking through the notebook style edge (so cute, right?!) I forgot to take a picture, I adhered it to the back of my white daisy base, as it had the cutest pocket for storing extra trinkets. 
Following through with the off set background, I added the half size honeycomb (bluebird cardstock), adhered the filmstrip photo matte(willow cardstock), heart medallion (goldrush cardstock) and sentiment 'Be Yourself" (sorbet cardstock) I have space to add a LOT of journaling, or a photo. 


This turned out so cute! 

1/17/2020

3D Friday Project| Treat Holder

Are you ready for Valentines Day?

Yeah me neither, but here we are looking for teacher, scout leader and coach treat gifts for this super fun holiday.

Today Michelle and I are teaming up for our 3D Friday Project, and we are bringing you this very cute treat basket. Super simple, this was created from one 12 x 12 cardstock and a few 6 x 12 scraps.


I just love the flowers added from the stamp + thincut set included in the Celebrate Today Cardmaking workshop. Each flower was paired with some gold embellishing thread behind it, popped up with some 3D foam tape, and a small julep glitter gem to the center. 


This adorable treat holder holds loads of candies and could even hold non-candy goodies also. Thanks for stopping by, now head on over to Michelle's Blog to see her basket treat holder! 

A list of supplies and a link to do all of your shopping in one spot is noted below!!!

Supplies: 
See ya Sunday for a new card! 

Danielle


1/15/2020

New Product Blog Hop | CTMH

So the new catalog is live, and with that comes NEW product. 


Welcome to this FUN Blog Hop where we are featuring NEW Close To My Heart product that was released on January 1st! You will fall in love with everything in this new catalog, so get your wish list ready!!! 
There is no better way to ring in a new year, and a new catalog, then with a beautiful new paper crafting project as pictured above. So many new products and artwork are pictured through out the new catalog and you will not want to wait to open it up and look inside. 

Don't have an Idea Book? You can view it online or place an order of any size on my website (or on the website of your Consultant.) When you place an order, you'll receive one FREE! (Be sure not to check out as a guest or it won't automatically be added to your cart.)

If you're coming from Haley Dyer's Blog, you're on the right track. To see a complete list of participants, click here.


I am sharing with you the new "I Chews You" set, that includes the My Acrylix® I Chews You stamp set and 7 metal dies to cut the shapes shown here.


When you pair the "I Chews You" set with the Card Front Spinner Thin Cuts set, you can create a unique gumball spinner card.

Watch my blog for creations using both sets! However, for today's post, I am focusing on just the  "I Chews You" set, and created a cute shaker style valentines machine.


I used raspberry, pixie, and sorbet inks for my stamping. I finished off the gumball machine with a clear shimmer brushed over the base and topper of the gumball machine, and black shimmer brushed on the dial.

Now head on over to Judy Faye Garner's Blog to see her new product showcase.

Thanks for hopping along.
Danielle


Time to sketch it out.

Using Sketches to creat projects.

Welcome, welcome! 
My post today is all about turning that layout sketch pin from Pinterest into a beautiful piece of artwork. 

First grab a sketch, my good friend Michelle and I have decided to use this Sketch found on Pinterest HERE and challenged ourselves to create individual layouts without discussing supplies that would be used. Then come Wednesday (our challenge due date) we would show off our creation here and create a video on our YouTube channels. 

I started off by grabbing my "For the Love of Color" book to create a palette that would be pleasing to look at. I chose Eggplant, Fern, and New England Ivy. I also choose to use two different stamp sets and a Thincut set (what #CTMH calls metal dies). The January Stamp of the month, called Everyday magic, and celebrate today stamp and Thincut set from the card workshop set. You can only get the celebrate today set by ordering the workshop, but honestly it's a true bargain. You get all the supplies you need to create 16 cards and...well that's another post right!
I choose White Daisy, Eggplant, Fern, and New England Ivy cardstock to work with. Based on the stamp sets, I decided I'd create my own background vs use pattern paper. 

The January stamp of the month set comes with a super cute dainty if you will heart stamp. This caught my eye as the perfect stamp to create a very subtle background with, paired with a  little white daisy pigment ink, I achieved exactly what I had in mind. 
I then sponged white daisy ink to create a stamping area for my title. Again coming in with the January Stamp of the month, I chose seek every day magic for my title in black ink. 

Next that sweet stamp set from Celebrate Today, comes in for the flowers and foliage. You can see tone on tone stamping with the flowers of eggplant on eggplant, and sponged the edges in white daisy ink. With the foliage, I used the light side of the new england ivy cardstock, and stamped the image in white daisy pigment ink! 
The entire page comes together with some gold embellishing thread and 3 little julep glitter gems. 

Make sure you hop on over to Michelle's blog to see her layout and video. Scroll down for a list of supplies used, where you can snag them and to watch my tutorial!


SUPPLIES:


Inks

Stamps

Additional Supplies 
Thanks for stopping by!
Danielle

1/13/2020

H2H Challenge | Cutting it Close

Happy Monday!

Welcome back to another H2H challenge, this week it's cutting it close. So grab your thin cuts and lets get to creating.  Is it ever too early to create a valentines treat? I think not.

The new "I chews you" stamp and thin cut set paired with the the Spinner Thin cut set, allows you to create an adorable gumball machine card.


Now that you are inspired to get crafty, get ready to submit your project to the H2H Design page. Remember your project should have at least one thing CTMH. 
Click here to link up. 

Thanks
DanYell 

1/12/2020

Let's put a new spin on things.

Happy Sunday funday!


Michelle and I are back at it! Today we are putting a spin on things, well cards are the things. We have decided to create a spinner card using the January Stamp of the Month. We are also posting a video tutorial EACH of how we created our cards! The link for Michelles blog is HERE and the video tutorial to my card is here:


Thanks for stopping by!
Danielle. 

1/10/2020

Creative Friday: let's make a box!

TGIF - Thank goodness it is Friday! 


Today I am back with my good crafty friend 
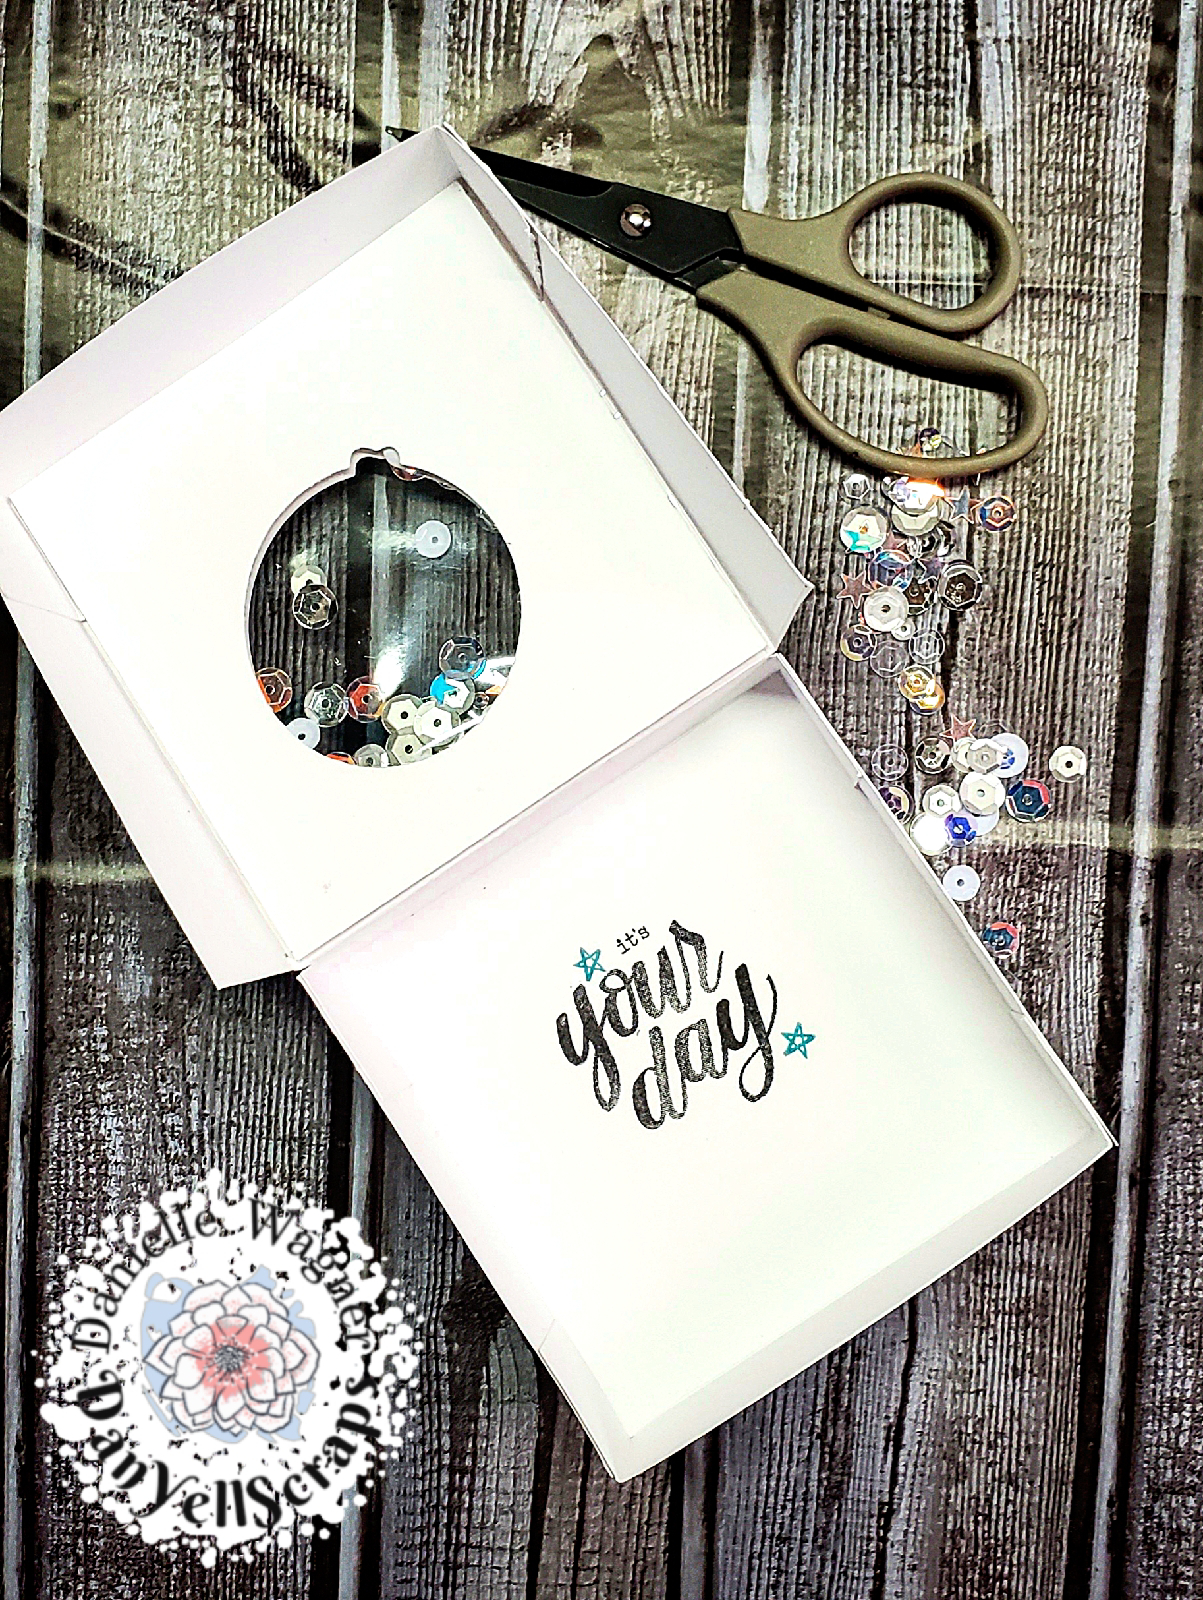
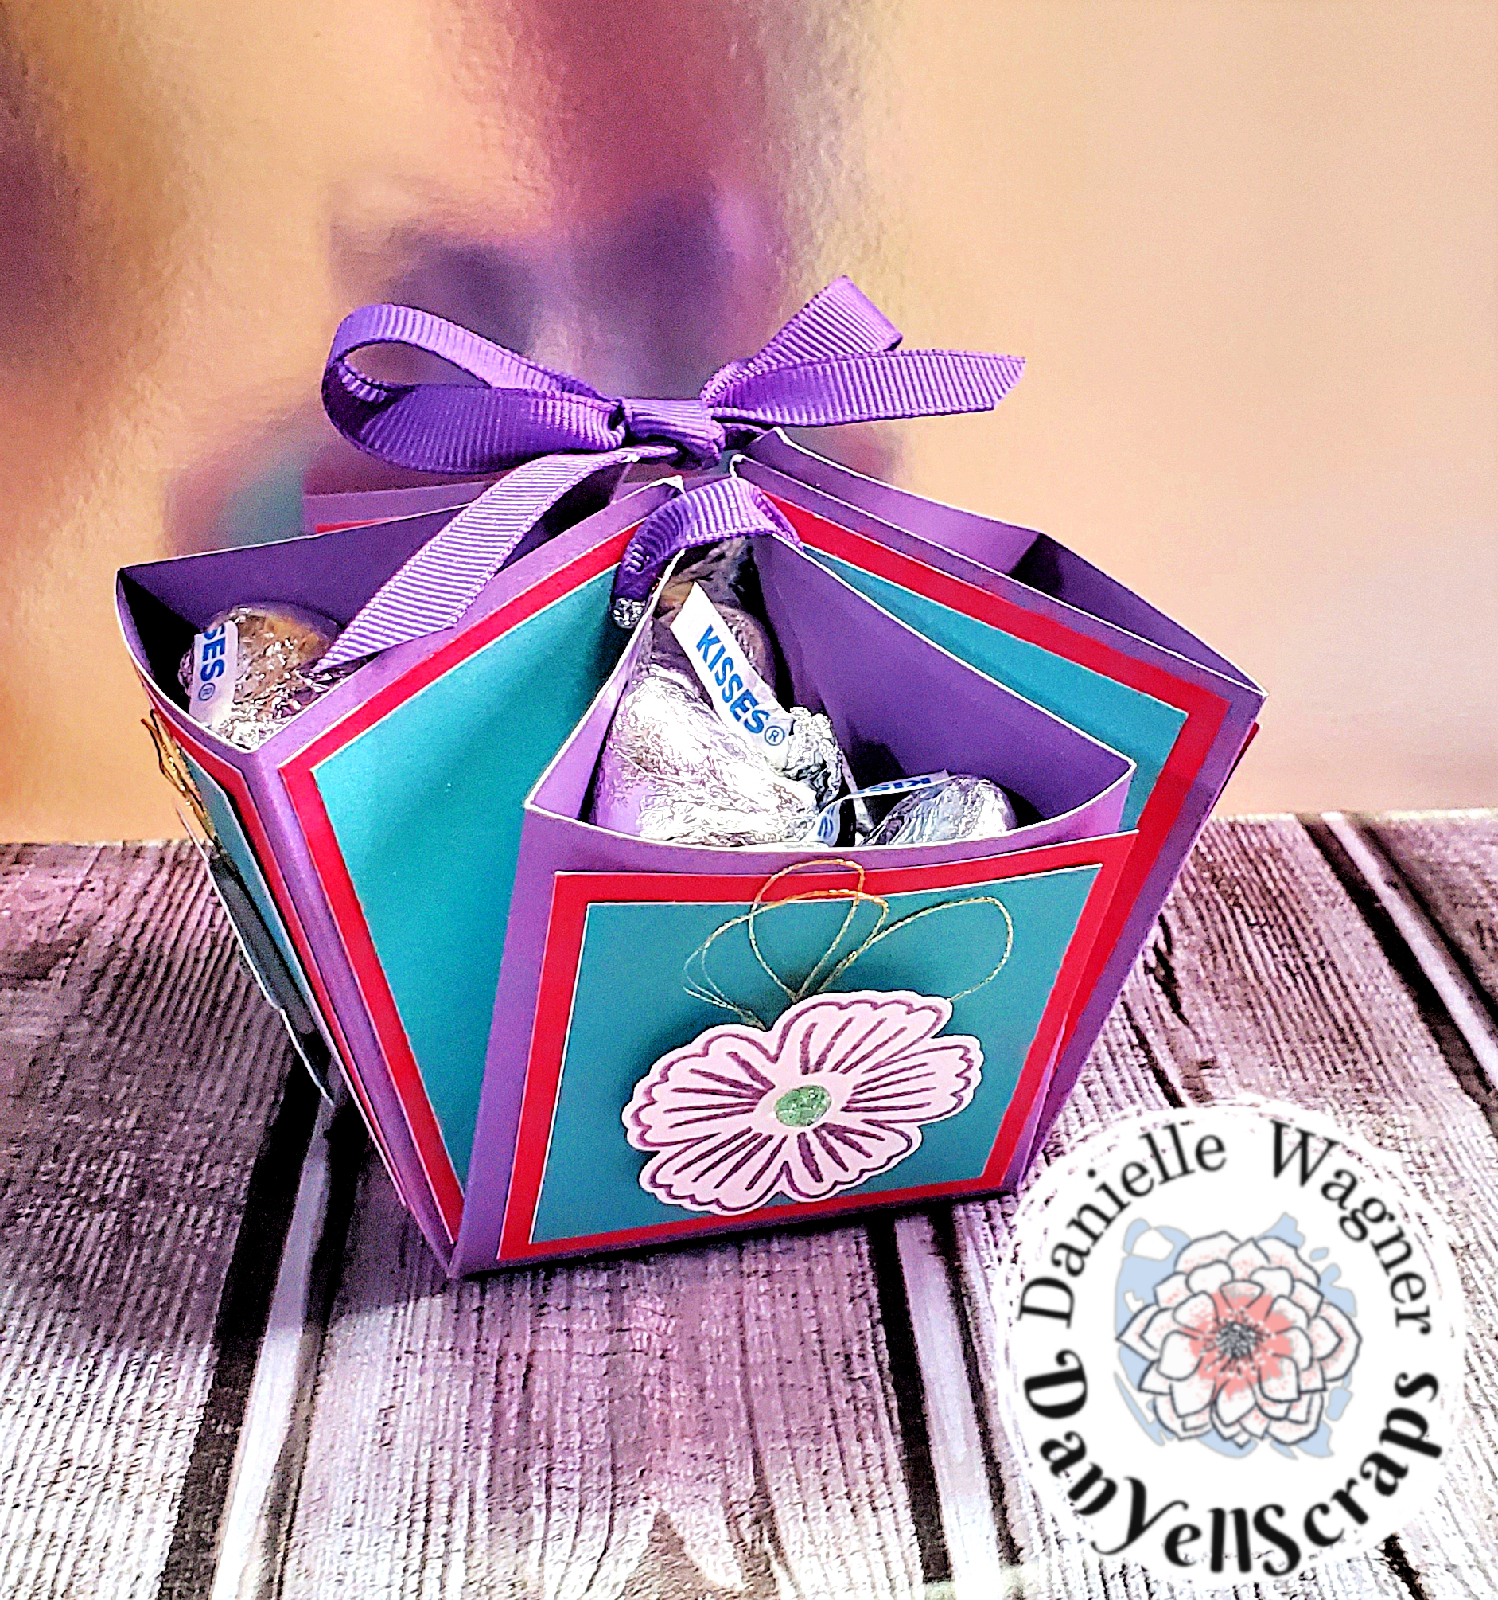
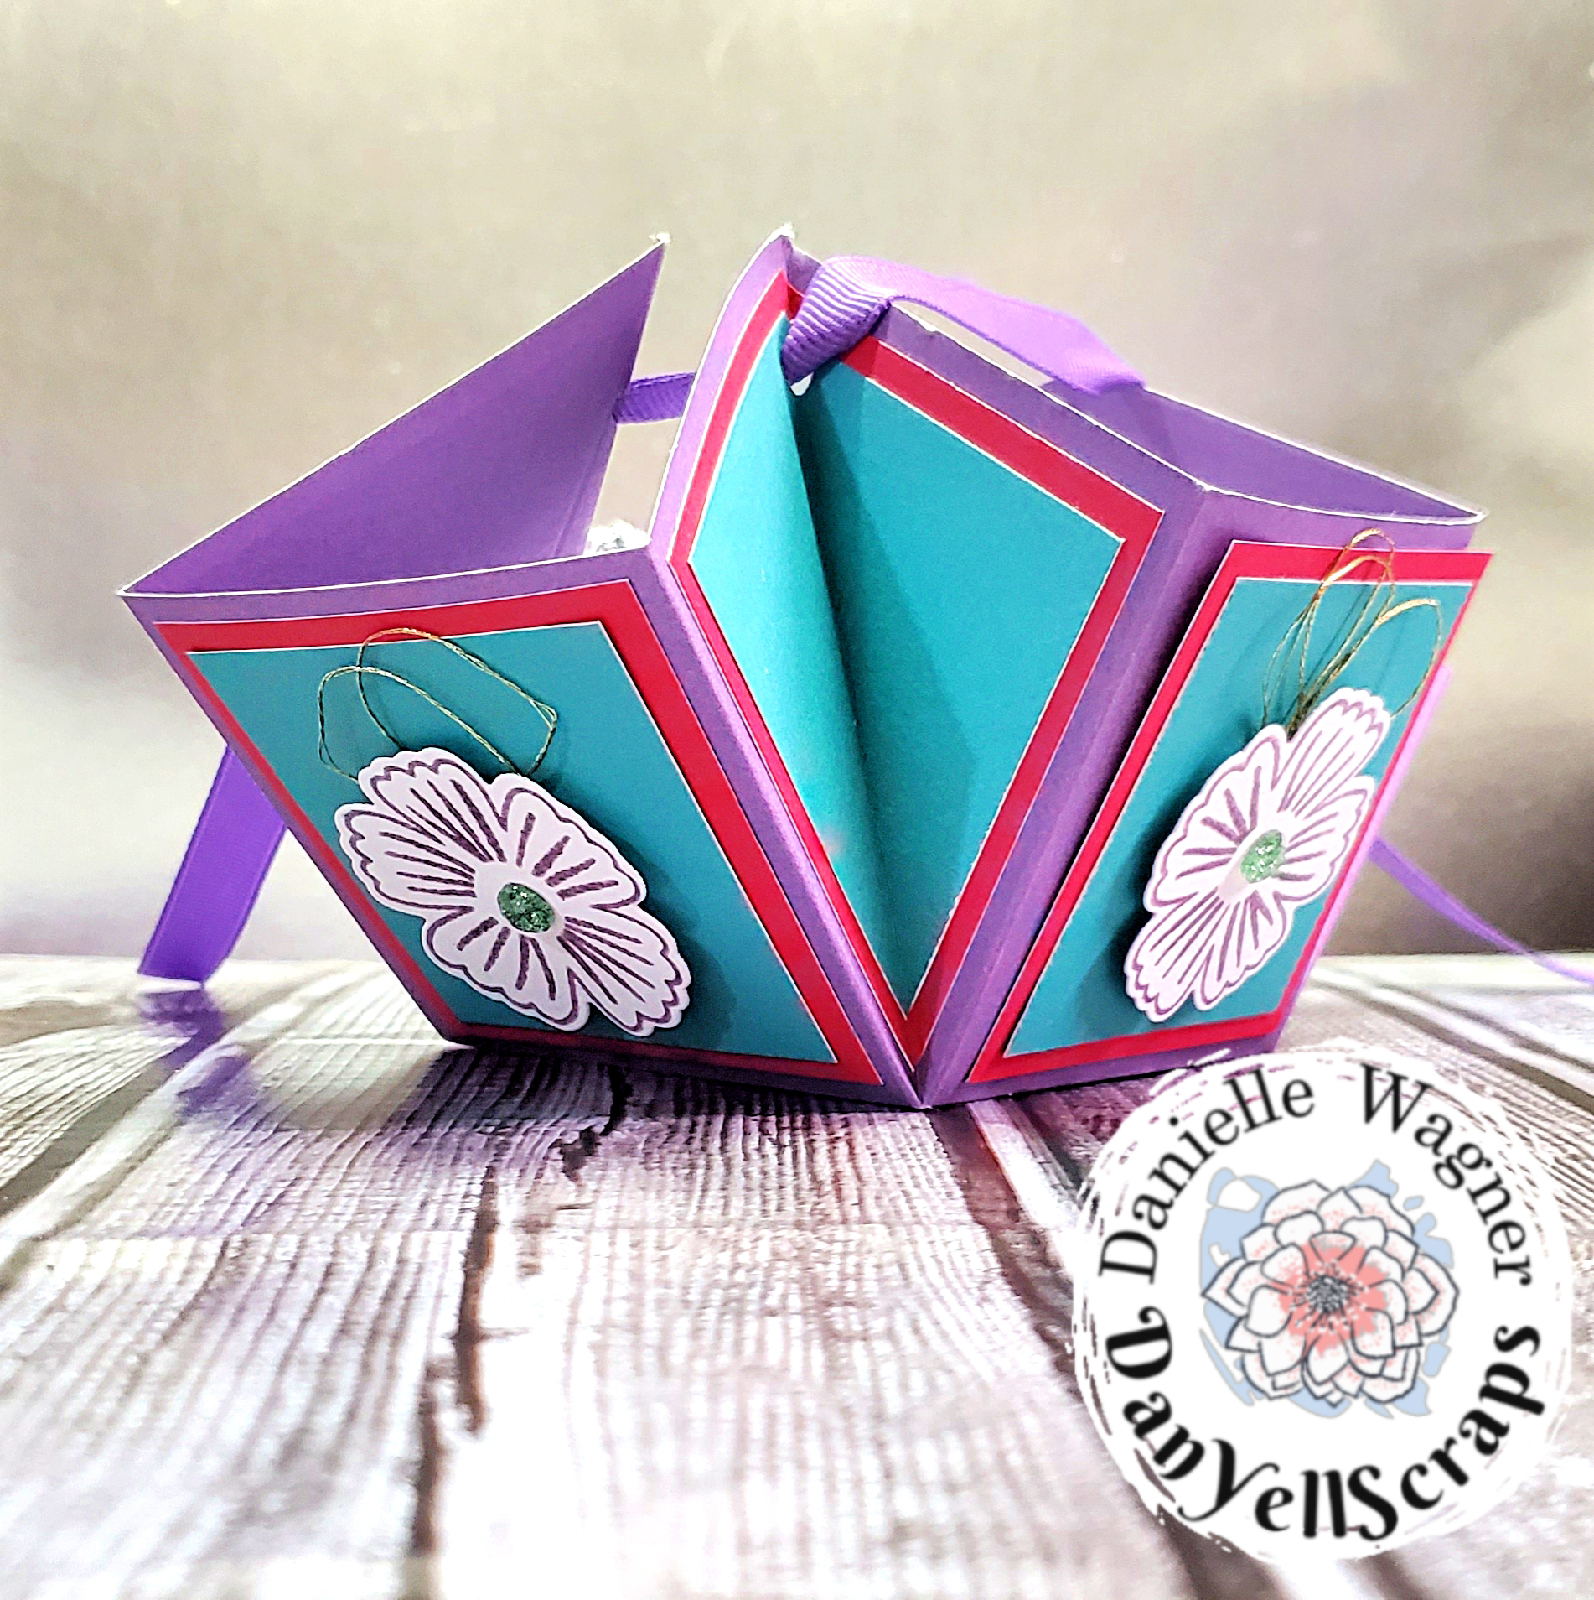
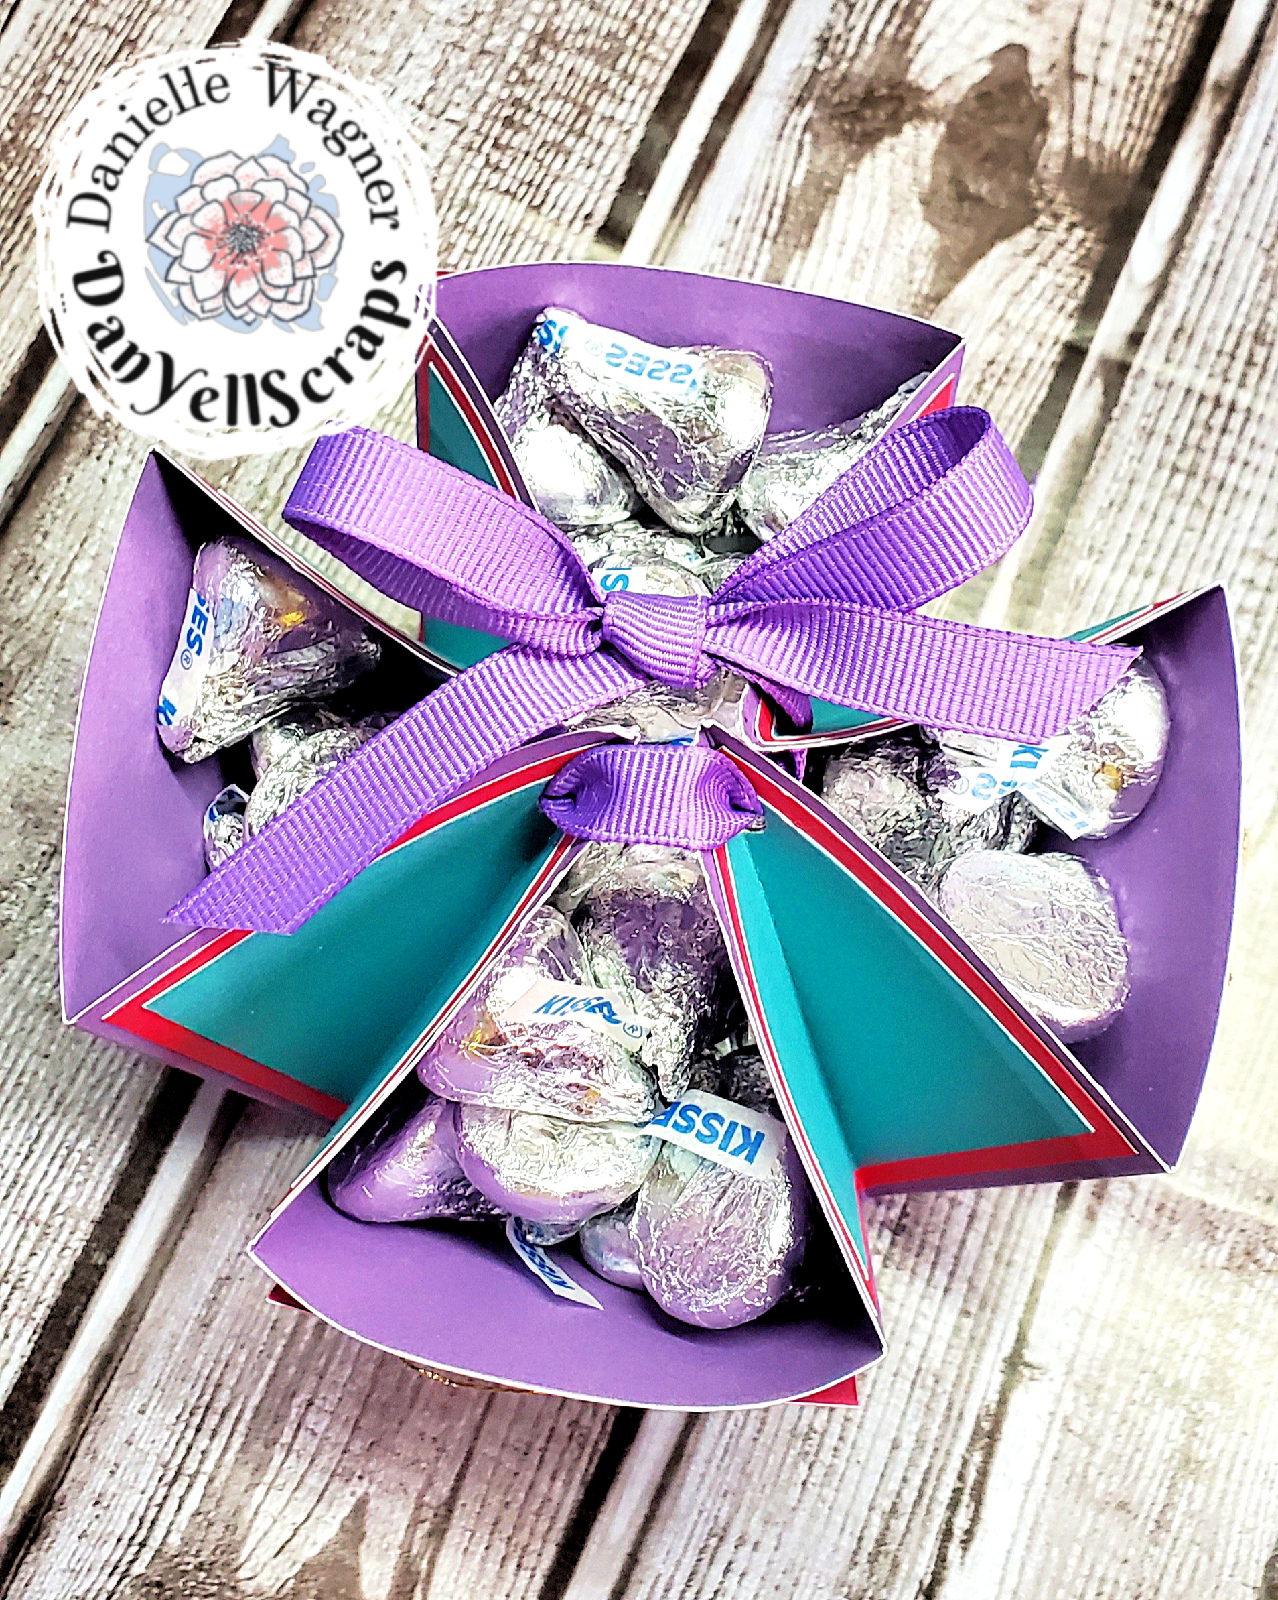
Michelle, bringing you a cute treat box (scroll to the end for an link to the original tutorial). I took some pictures along the way, and will do my best to recapture the steps...honestly as I was crafting along, I forgot to stop and take photos.

I am pairing this box with the January Stamp of the Month: Everyday Magic!


The box is 4x4, however it sits inside a 6x6 platform. 

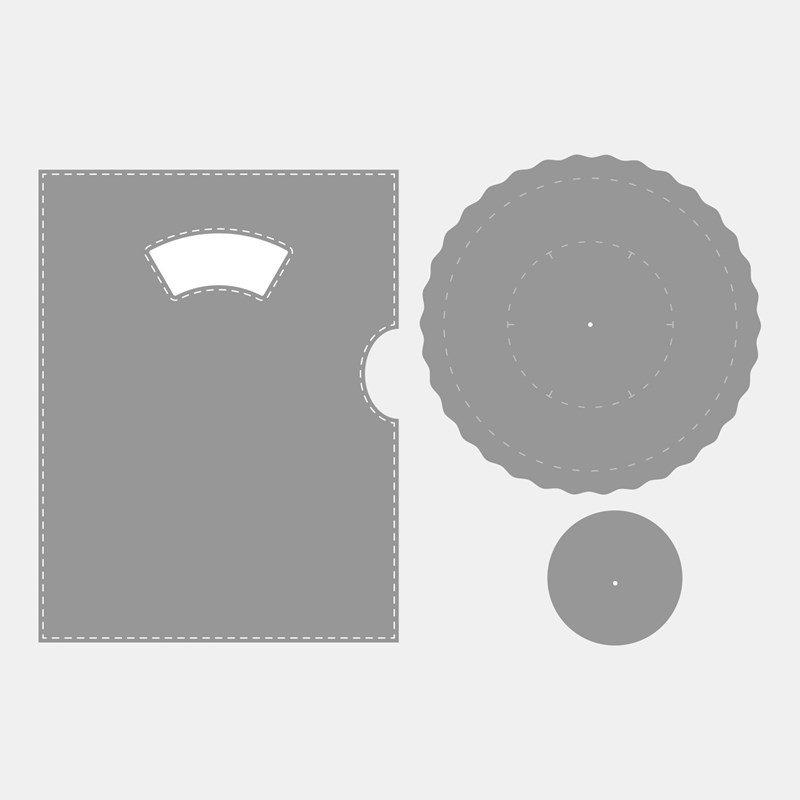
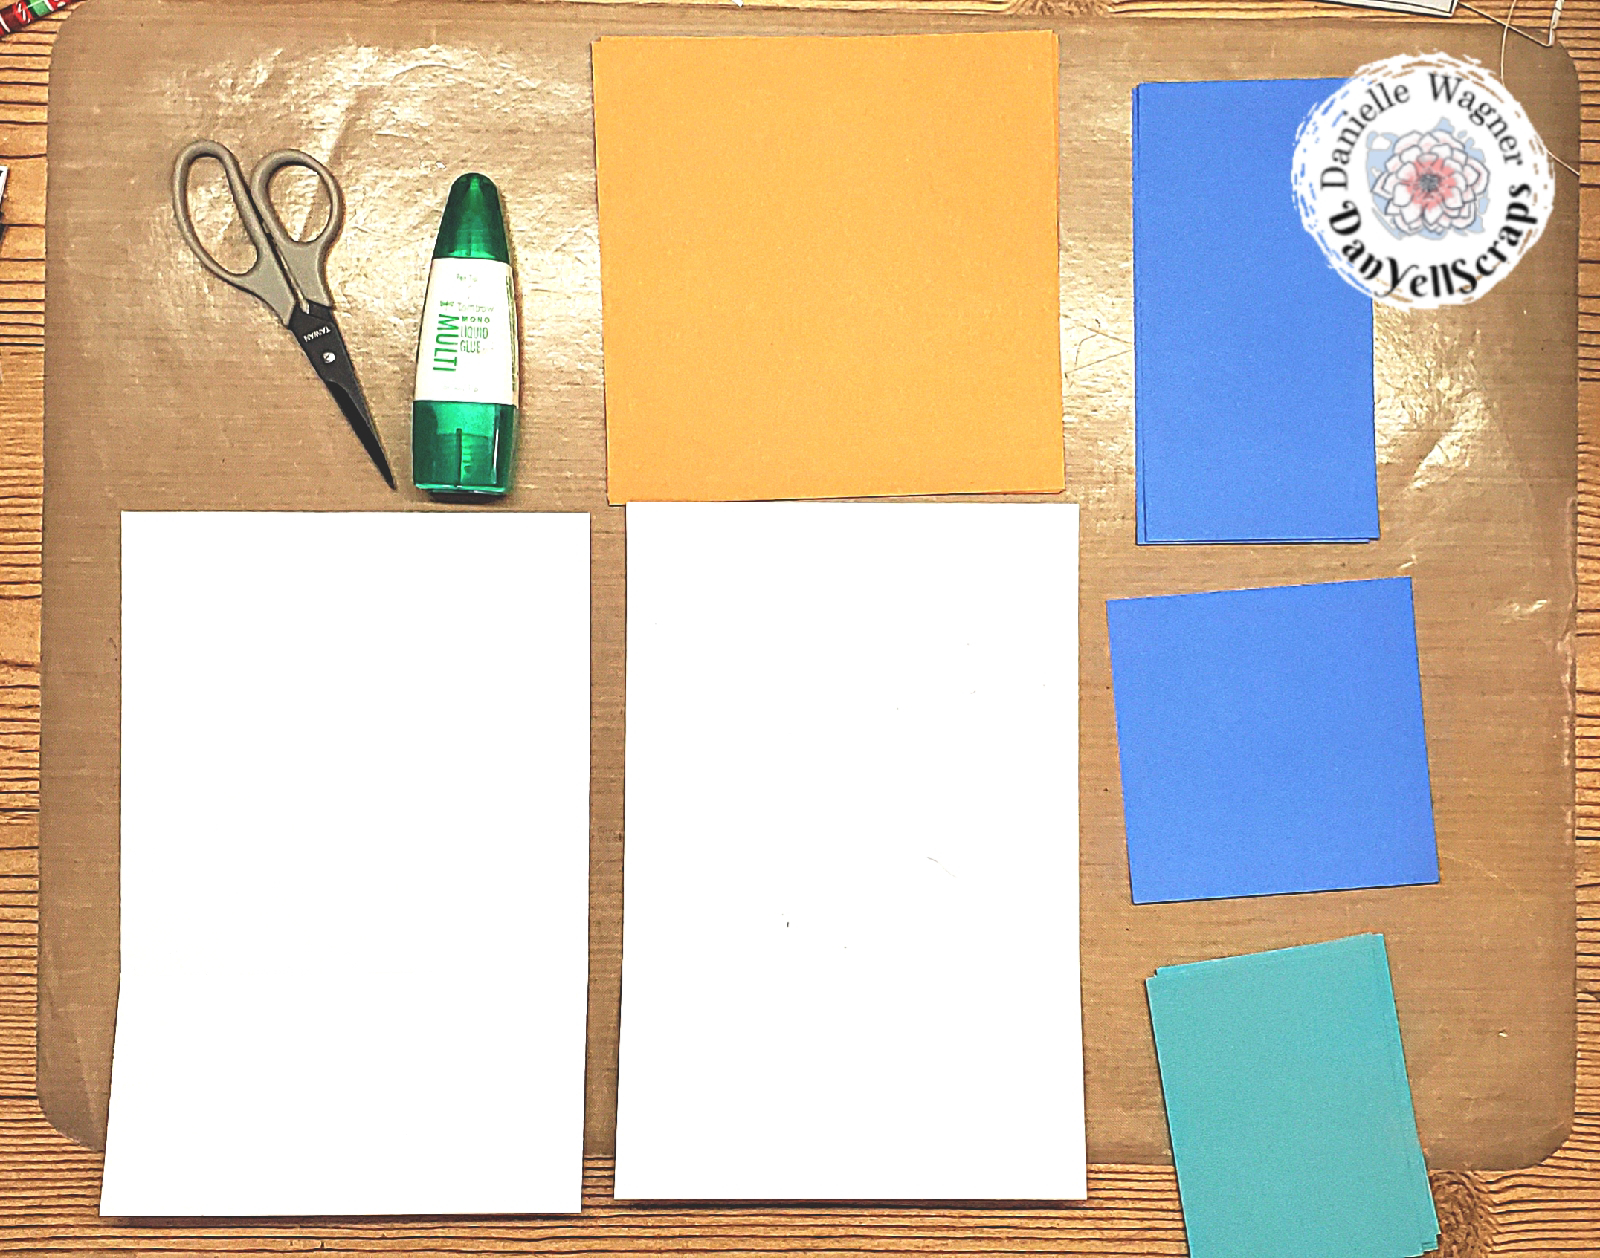
You'll need the following cut pieces. 
All measurements are in Inches

  • (2) 6 x 9 
  • (1) 10 x 10
  • (2) 6 x 3
  • (4) 6 x 6
  • (1) 4 x 4 
  • (8) 4 x 3 - I found I had to trim these by 1/8 of an inch on two sides to get a nice fit. 

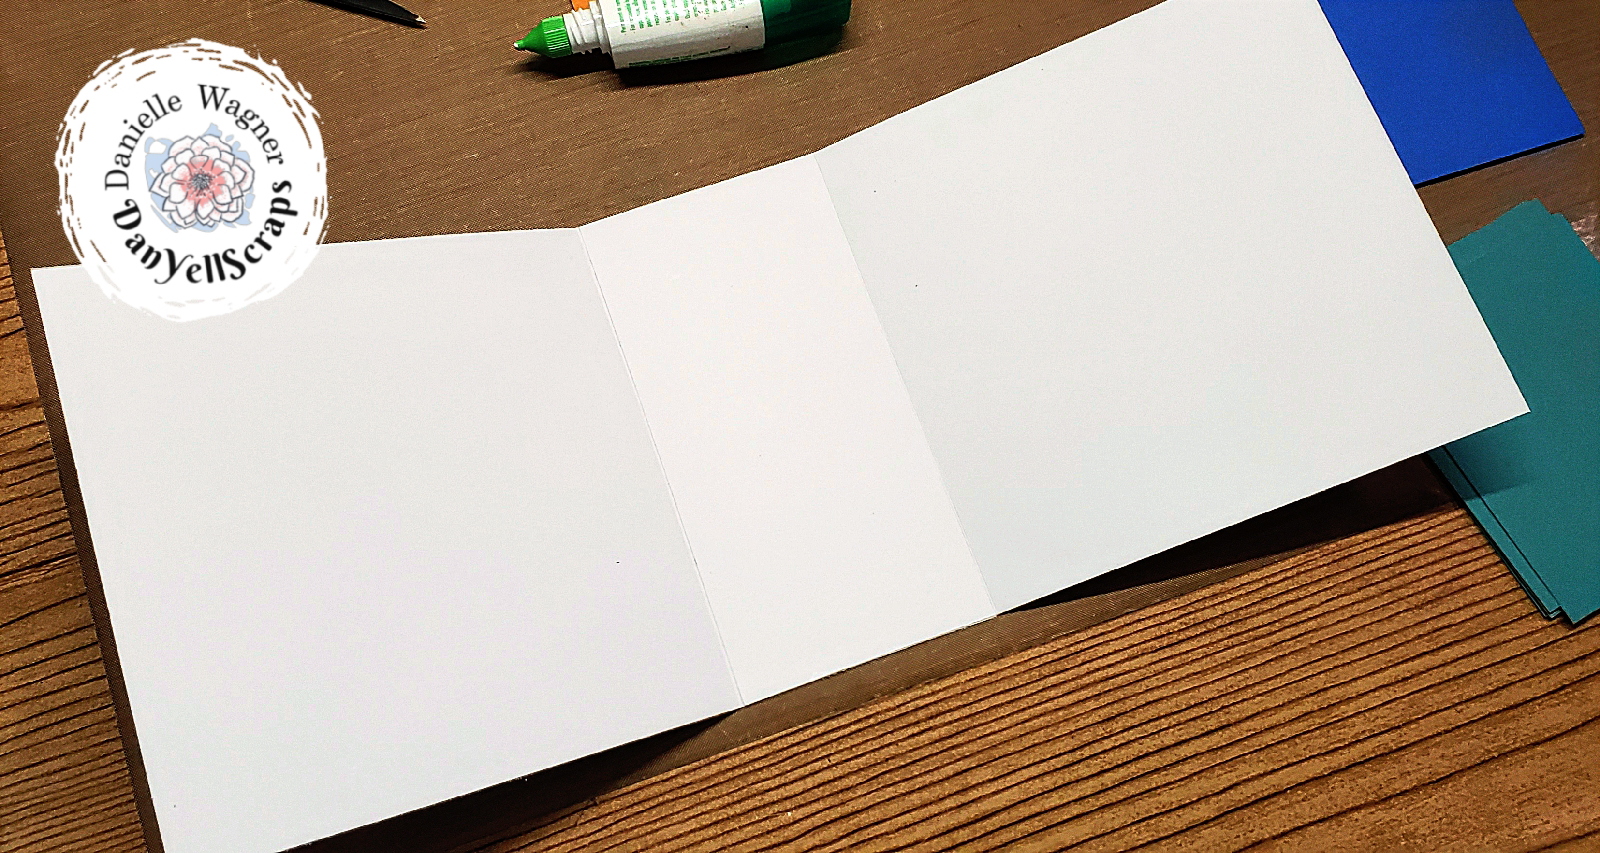
You will want to score each 9 x 6 on the long end at 3 inches. Then adhere the two together marrying the ends of the 3 inch score lines. This should give one 6 x 15 piece. 
Next add your (4) 6x6 pieces and your two 3 x 6 pieces to the front and back. 

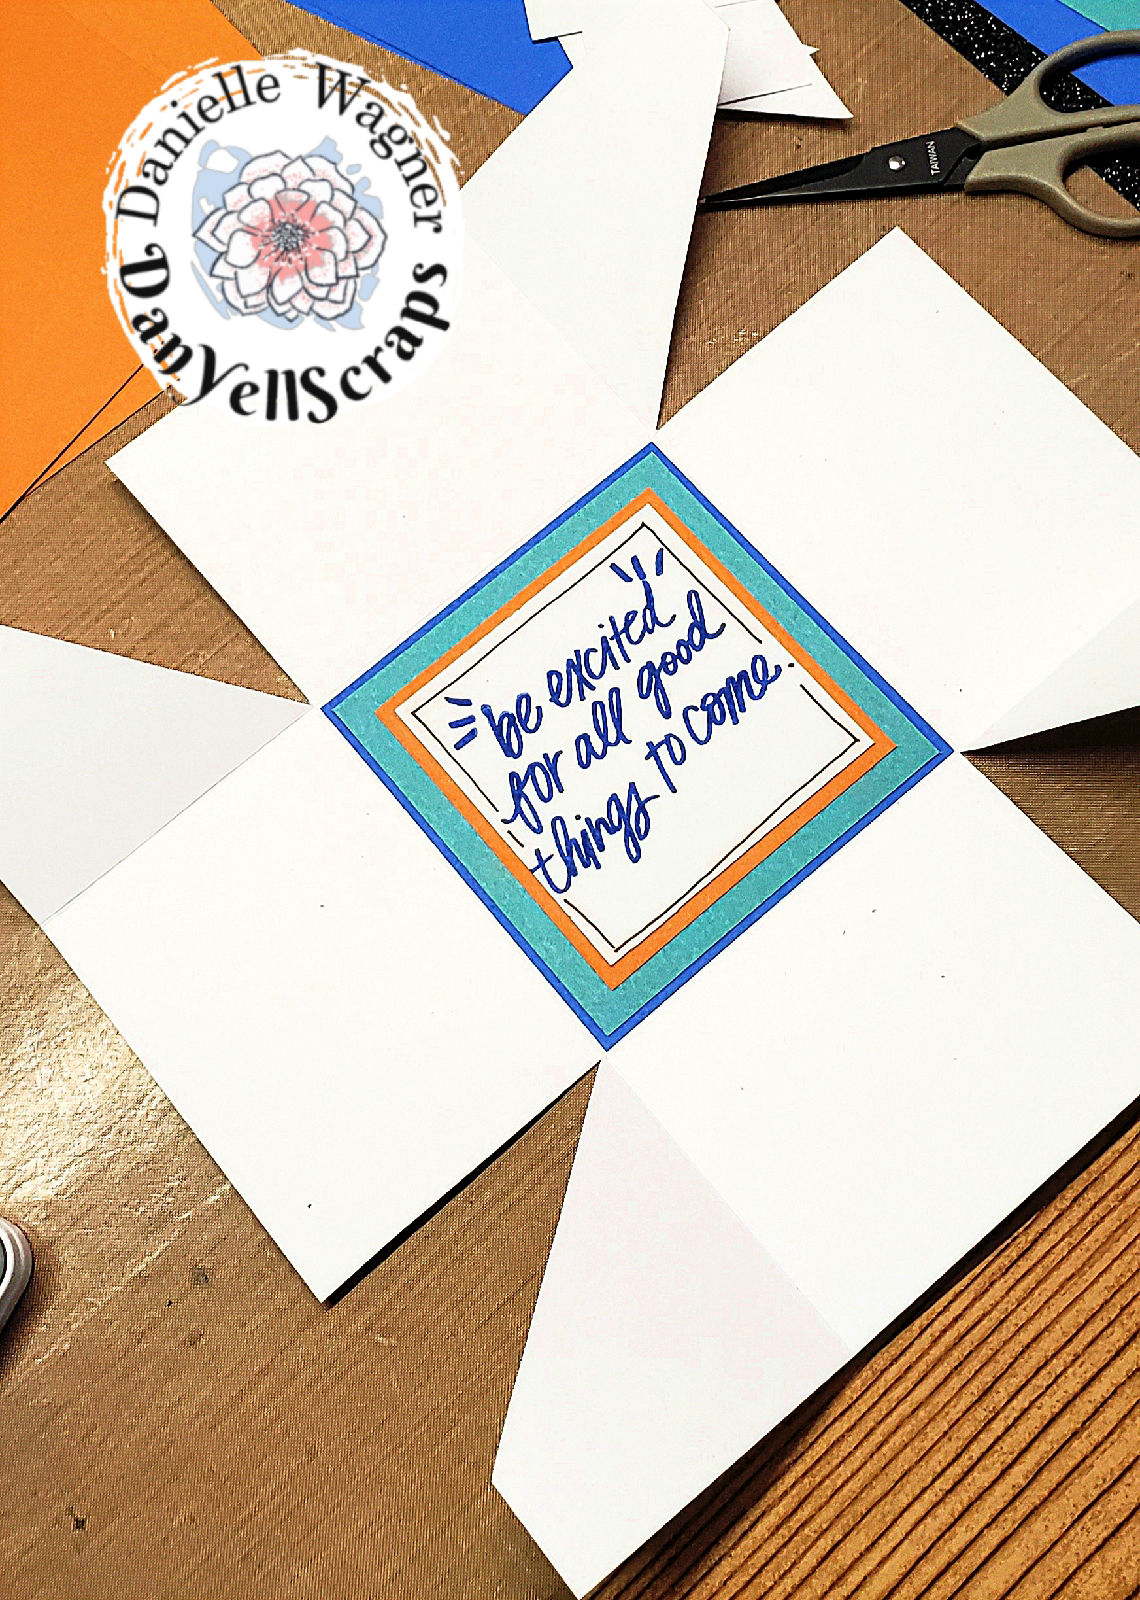
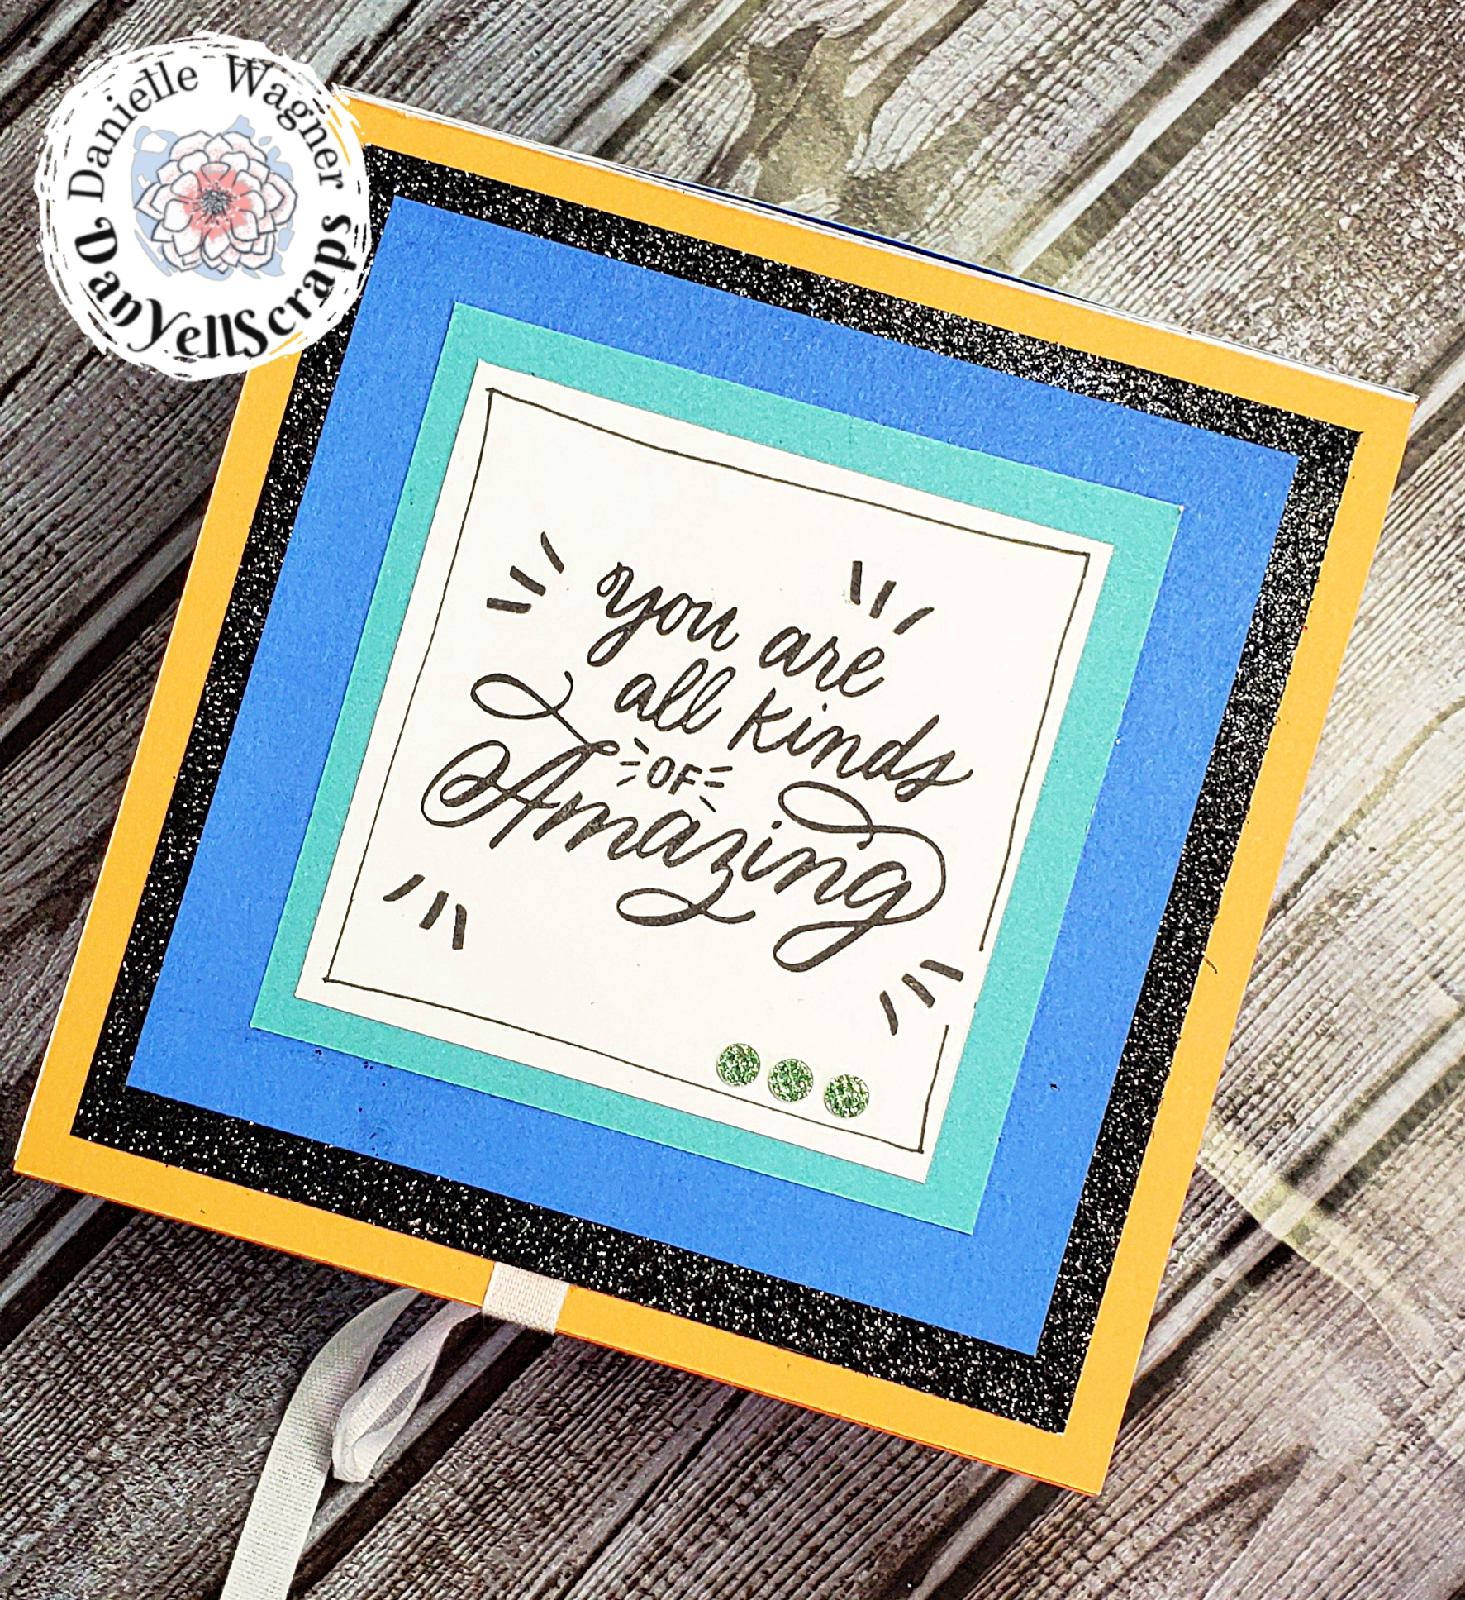
You will want to score your 10 x 10 piece at 3 and 7 on two sides. Leaving you with (4) 3 x 3 corners, a 4 x 4 center, and (4) 4 x 3 sides. Cut at scoreline of each side at a 3x3 corner. Then cut a diagonal piece out, as shown in the picture. When you're done it will resemble an odd flat pinwheel (if you will). Add your center 4 x 4 piece now, and embellish if you wish. I added 2  additional layers, a 3 3/4 x 3 3/4 lagoon cardstock and a 3 1/2 x 3 1/2 saffron card stock. My stamped image is on a 3 x 3 piece. 


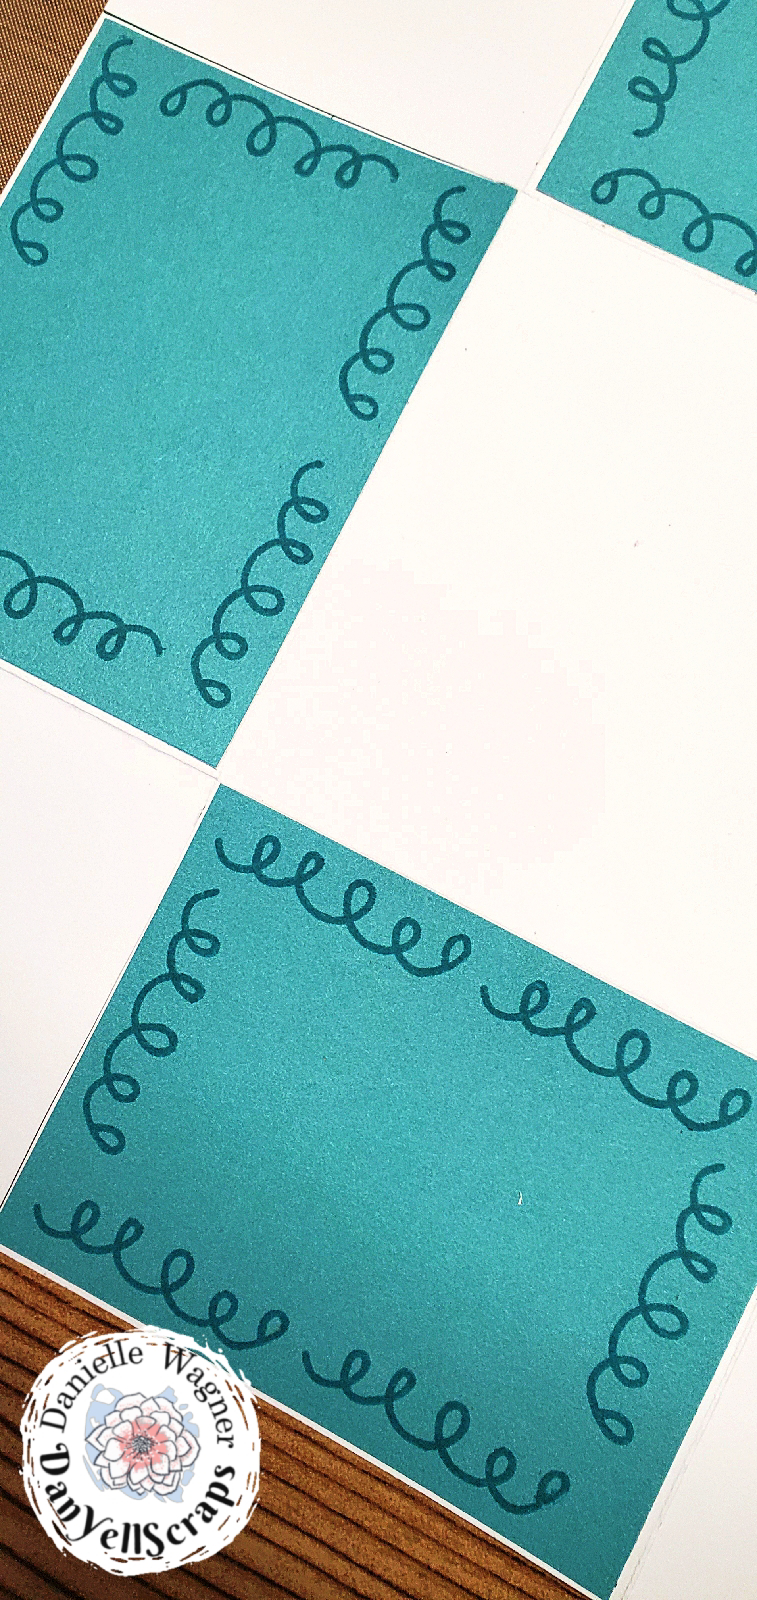
Flip your 10 x 10 over, decorate 4 of your 3 x 4 pieces and adhere. These peices will be visible, so you could save yourself some time and use pattern paper. 

Fold your angled pieces inside the 3 x 4 to create a box, add adhesive. Use the remaining 4 pieces of 3 x 4 card stock to the inside.  Adhere your box to the base of 6x6 section, of the 6 x 15 piece. 

For my top and bottom I added ribbon to the middle so the box would close. This would be better suited to do before you add your 6x6 base pieces, as you can see I forgot... however it worked out just fine. 
To hide the ribbon invaded a 5 x 5 piece of cardstock to the bottom and top. 


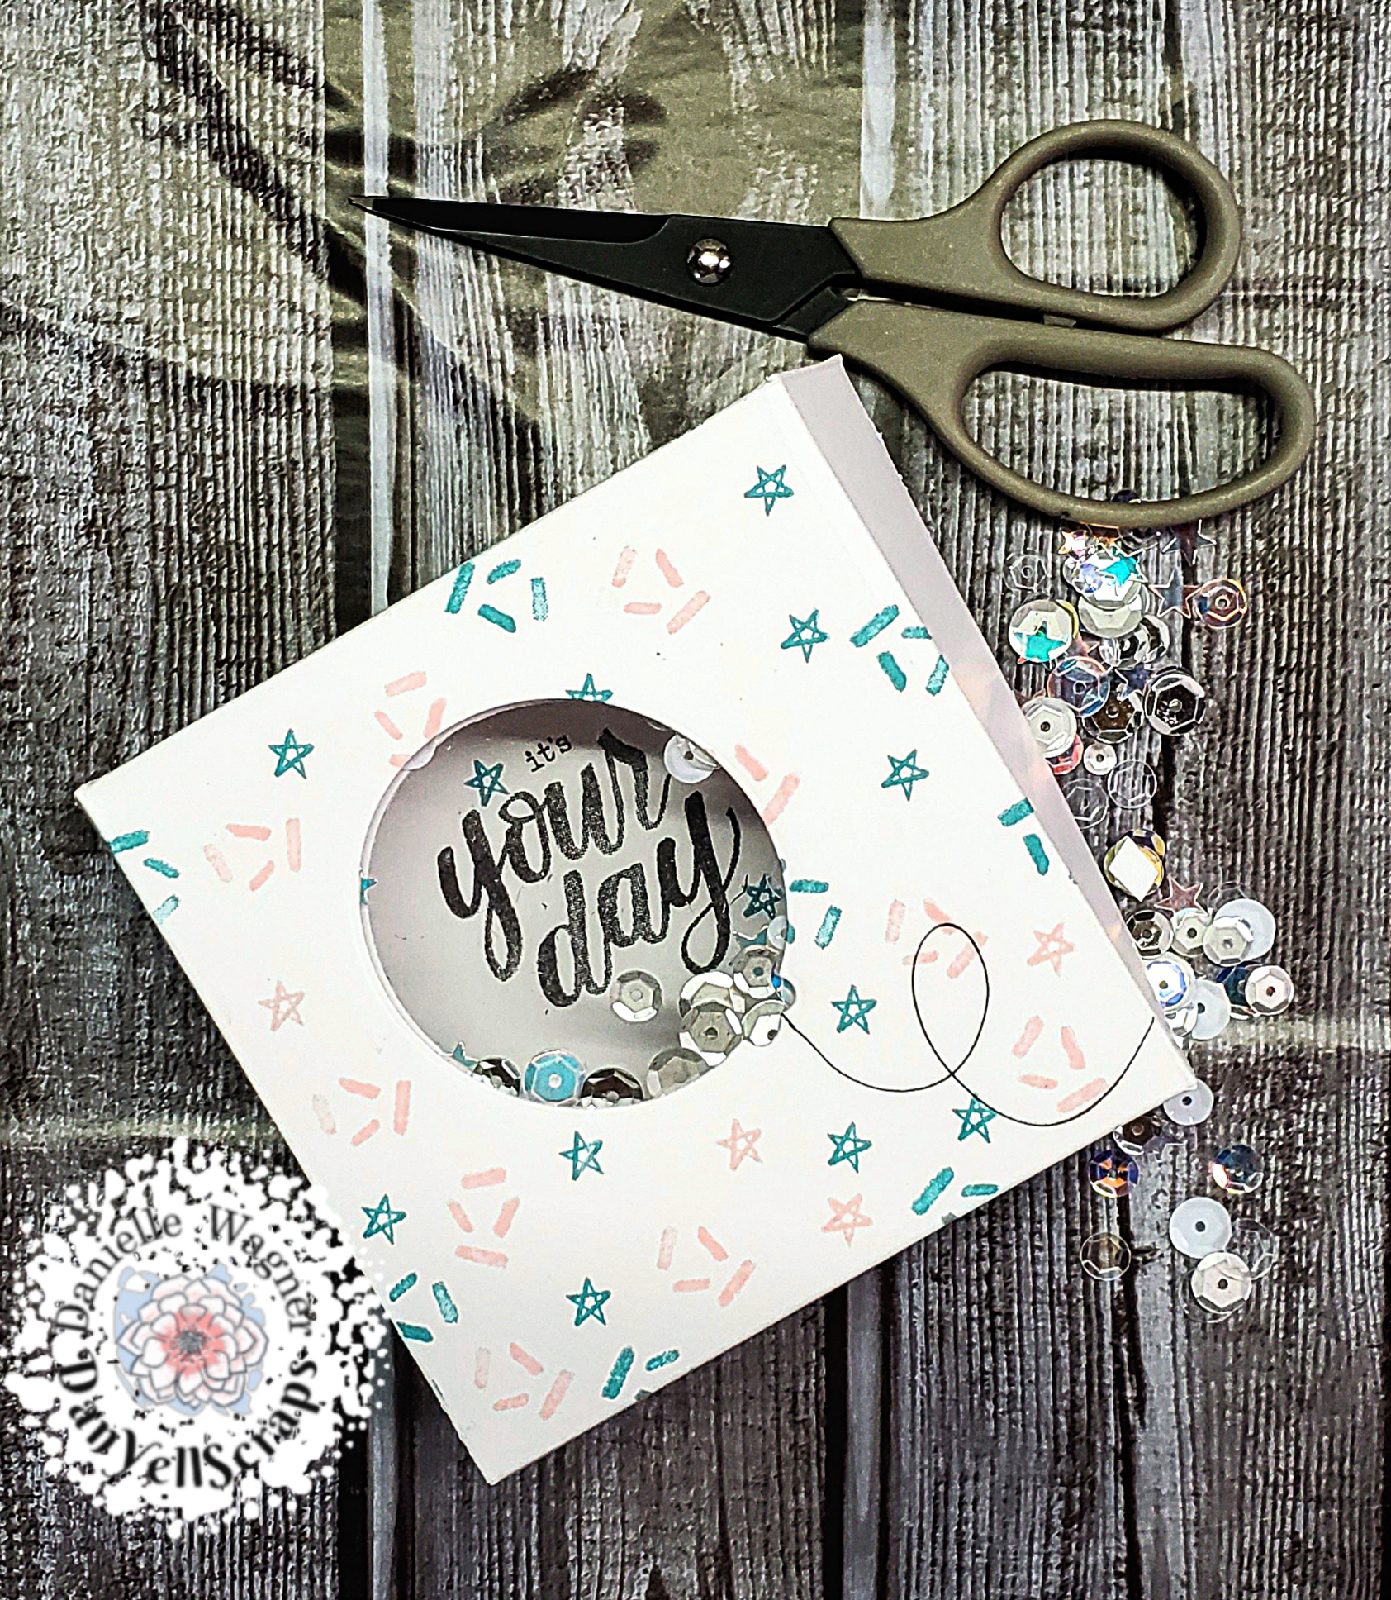
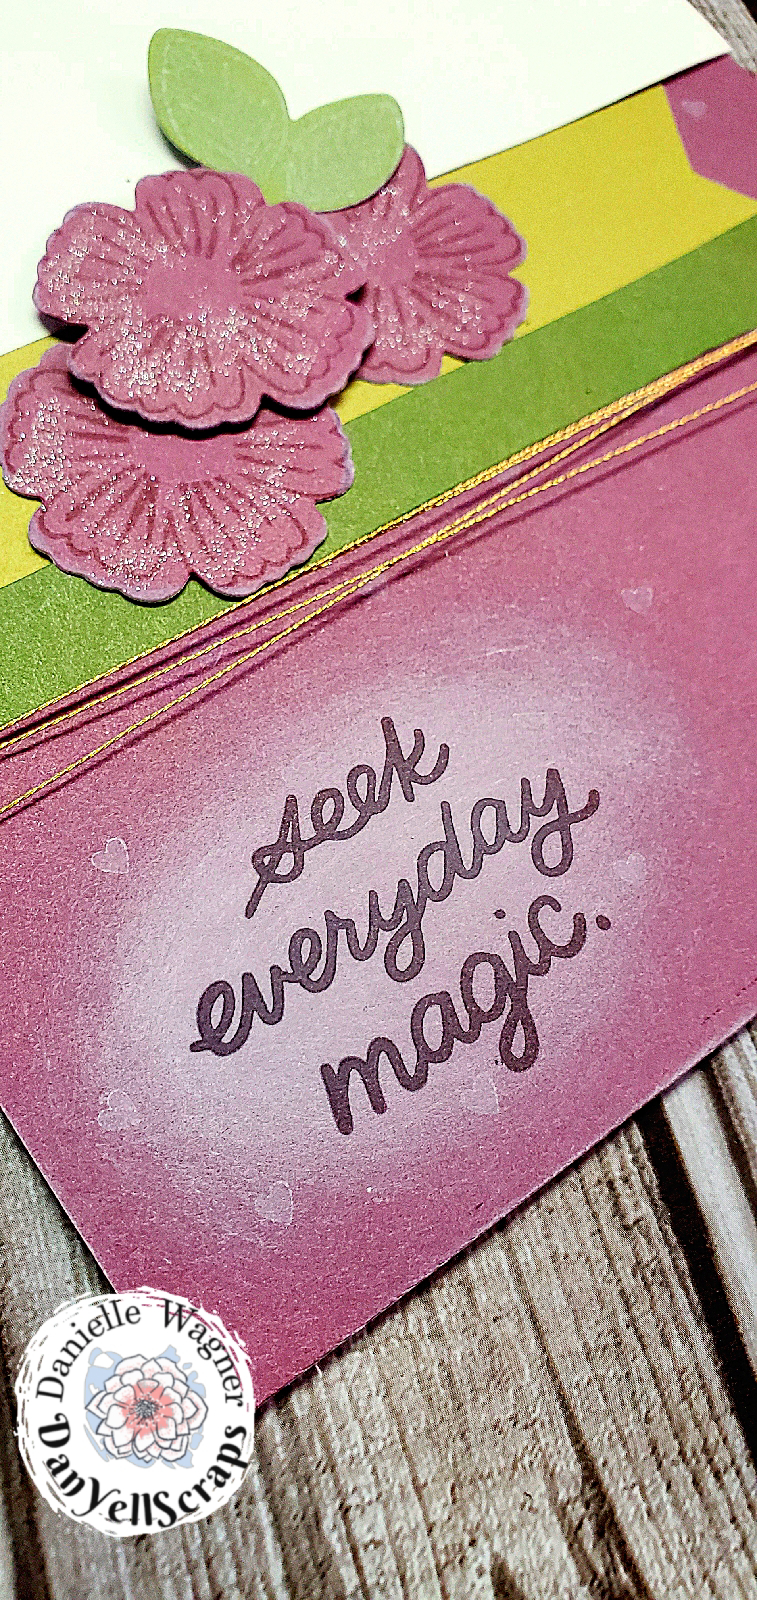
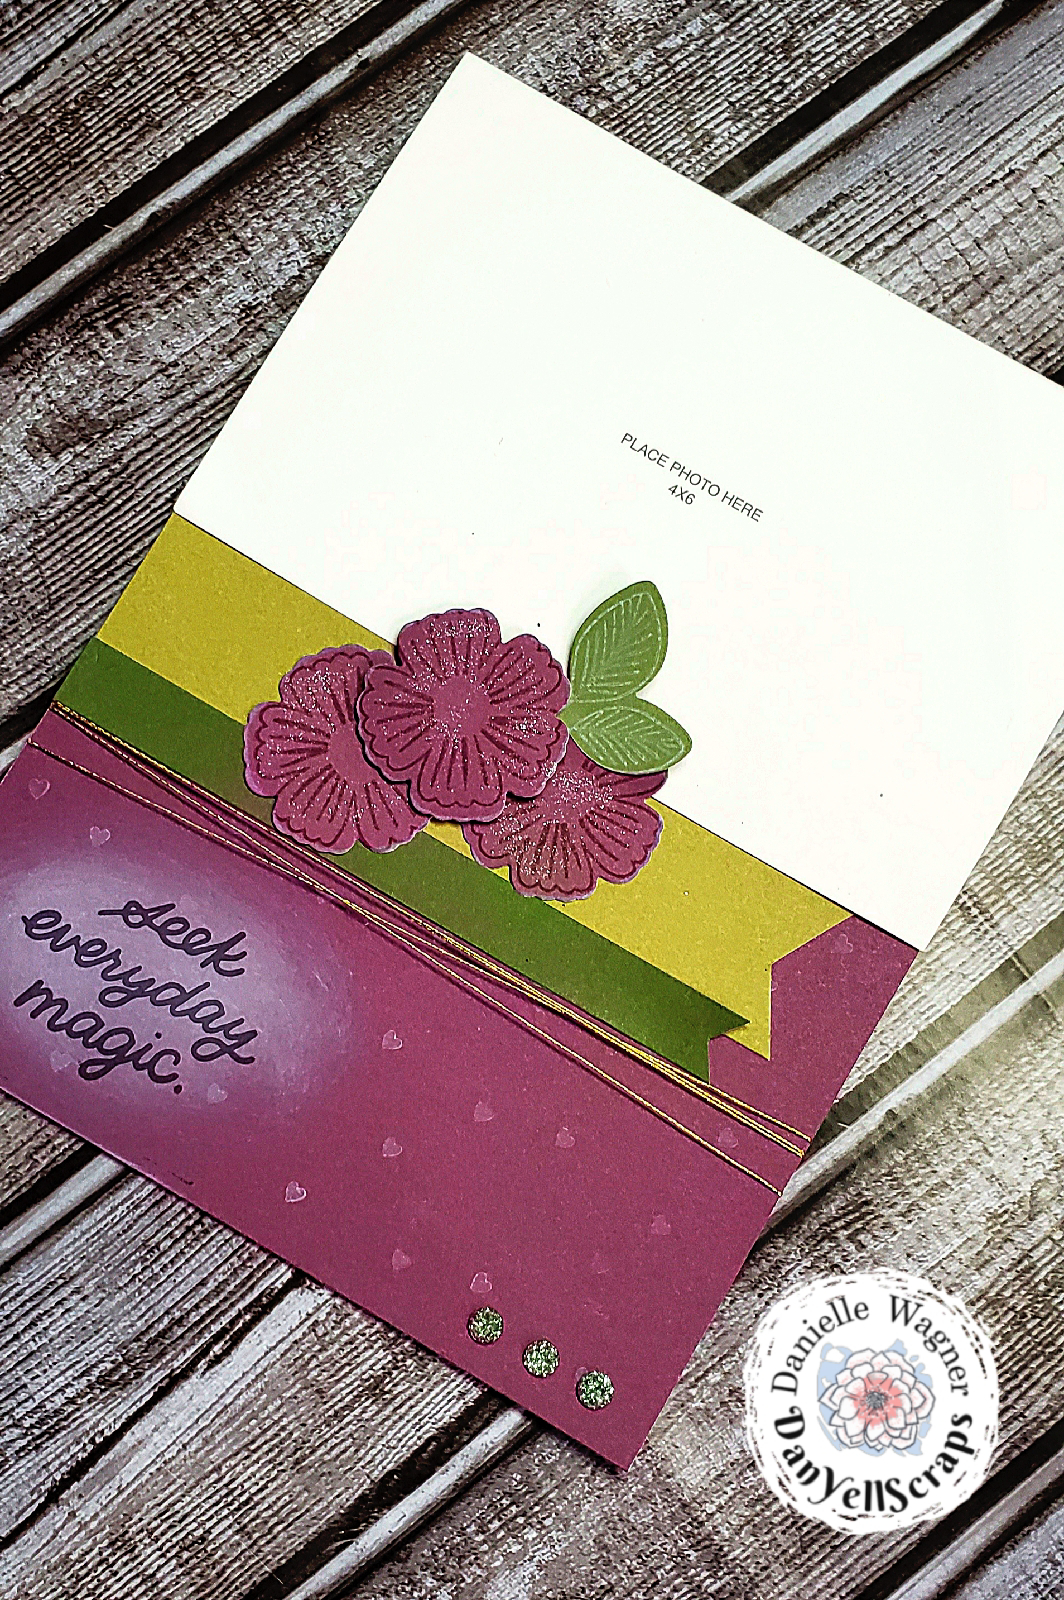
Additional layers are 4 3/4 x 4 3/4 bluebird cardstock,  4 1/4 x 4 1/4 lagoon, and a 4 x 4 white daisy, stamped with "you are all kinds of amazing" from the January stamp of the Month set. Add a little bling with the Juelp glitter gems.

I will fill this with candy for an easy gift this February to my scout leaders! 

Hop on over to Michelle's blog to see her twist on this box. 

A full list of supplies and links to order them, are below along with the original tutorial. 

Thanks for stopping by! 
Danielle

Supplies Used: Click on and item for a link to shop

This box followed this tutorial found on split coast stampers. 

1/08/2020

Bash Your Stash Wednesday

Welcome to the Bash Your Stash Wednesday post.

For the next few weeks on Wednesday we will be bashing our stuff by creating a mini album, one layout at a time.

This little project will be in collaboration with my crafty friend Michelle and fellow Close to My Heart Consultant sister. We have picked a sketch, and without any promoting, we've created our own versions of this sketch. Once your done checking out my layout, you'll want to hop over to her blog and see what she did the same sketch!

Our chosen sketch for this week, click the picture to be directed to the source of this sketch.


For starters, I dug out some old sampler papers I have. (Remember this is a bash your stash project anything goes) 

Knowing that this is a mini album and the pages will be 6x8, this sample pack of 6x6 papers will be perfect for this project. Each piece is double sided, and thats make for great versatility in a mini album. 

Next I cut my pieces based off what I thought the measurements [might] be. Because it is a sketch, the measurements are an interpretation of what you feel. As you can see this sketch holds a spot for a 3x4 photo, and this was my guide to cut the rest of my pieces.
Base page is 6x8 in white daisy
Two 3 x 6 patterned paper pieces
One 5.5 x 4.5 cardstock piece in glacier
One 4.25x5.25 white daisy journaling/photo area. 

Next I die cut a cluster of flowers from the new spruced up cardmaking kit stamp and thin cut set for an embellishment. I colored it using the new spectrum noir tri-blend markers. 


I decided my layout could use more pictures so, I incorporated a flip flap. 


Finished off the page with some gold embossing thread under the cluster of flowers and three sequins off to the right. 

Here is my final page!


Scroll down to check out the list of supplies used, and then head on over to Michelle's blog to see her creation! 


1/06/2020

H2H Challenge| Something New

Hello and happy Monday!

The theme of this weeks challenge for Heart 2 Heart challenges is Something New.  
Using the new All Around Creativity Kit, I am sharing with you my creation! There are four kits to choose from, and I selected "Create" All wreaths come as unpainted wood. 


As you can see I altered my wreath, by painting it with two coats of black craft paint, and then applying two layers of shimmer using the CTMH black shimmer brush. 


Now that you have been inspired to create something new, head on over to the H2H page to upload your creation. 
Remember your creation, must have at least one thing that is CTMH to be qualify. 
Click here to link up. 

Happy Crafting!
DanYell Scraps

1/01/2020

Card Workshop | Spruced Up

Hello and Welcome!

I am so glad you popped in to join my in person card workshop. This workshop will feature a shading tutorial using the TriBlend™ Markers. a few tips and tricks and you will take your coloring to the next level!

You will use the materials provided and easy-to-follow instructions from meto create 3 standard size cards, 3 each of 3 designs. You will have access to inks, blocks, stamps, adhesive, julep gems and markers to complete each of your cards. All cards come with envelopes. You are more than welcome to bring you own adhesive.

Lets take a quick look at what we will be creating, scroll down to the bottom to register.

Card #1 Hello Friend

Card #2 In Our Prayers

Card #3 Sending comfort
Ready to sign up? Use my PayPal link (no need to have PayPal to use this) and you will automatically be signed up.