2/22/2018

Partial Die Cutting: Punny Pals

Hello Crafty Friends & welcome back to DanYell Scraps.

 Punny Pals is one of my all time favorite stamp and die sets. (Heads up the coordinating punny pals thincut die set is on the going soon list, so if you have had your eye on it, now is the time to get it.) I have for you a super simple yet complicated looking card. It's really not that complicated....trust me.


So lets go over just how this must have card is made!
Here are the supplies you'll need to duplicate the above card:


  • White Daisy Cardstock
  • Punny Pals Thincut Die Set
  • Coordinating Punny Pals Stamp Set
  • Shinhan Markers in G46, BR116, R11, BR96, WG4, & Colorless Blender
  • Black momento Ink
  • Clear Shimmer Brush
  • Cricut Cuttlebug™ - if you don't have one - Click here to learn how you can get one through ME your favorite CTMH Gal! 
Here are the step by step instructions:
  1. Start with White Daisy cardstock cut to 4.25 x 5.00 inch
  2. Line the Punny Pal Thincut dies at the top of your base, as close to the edge with out going over. make notations on either side of the dies that you want NOT cut. Remove the Thincuts and complete the line.
  3. Secure the Punny Pal Thincut dies with a low tac tape such as washi tape. 
  4. assemble your cutting plates and material as you normally would, with the exception of the top plate. 
  5. The top plate will be placed partially over the materials and Thincuts, using this line you drew earlier as a guide. The edge of your plate should marry up to this line. Whatever the top plate covers will be cut. the area the top plate does NOT cover will NOT be cut. 
  6. Remove the material, and using a craft knife or trimmer, cut away the white daisy in between each Thincut.
  7. I colored the "ground" in WG4, then used the colorless blender to remove color starting with a heavy hand at the bottom and gradually working up. Any color would work for this. 
  8. Color the Punny Pal character's as you see fit.
  9. Stamp your desired sentiment, Thank you, seen on this card is from the 2018 Feb Stamp of the Month Sunny thoughts. 
  10. Line your card panel where the punny pals blend into the card with the top of your card base. Mark at the bottom where your card base hangs off, and then trim there. This keeps your card at a 4.25 x 5.00 inch A2 size. 
  11. Adhere your Panel to the Card base with your favorite strong adhesive. 
  12. Apply Shimmer to any areas, this card has the shimmer applied to the sentiment and the banana in the monkey's hand. 

Thank you for stopping by today.

You can find all the supplies used today in my online shop: www.DanYellscraps.ctmh.com 
** Disclaimer ** I do receive a small commission when purchases are made via this link. 

Happy Crafting. 
Danielle


2/15/2018

CTMH Technique Blog Hop - In Love with Vellum


Welcome to the CTMH Technique Blog Hop! This hop has 10 participants and if you came from Catherine Nowak's blog, you are on the right track! 

There are so many vellum tips, tricks and technique, one project I have ALWAYS wanted to create was a luminary. So, today, crafty peeps, I have just that for you, a cute luminary created with the CTMH Cricut® Artistry Collection, and CTMH vellum paper


Image #M418F7B,was welded to image #M418B8E, with a rectangle added to one side, and cut four times. 


 Here is a quick pictorial of what I did to adhere the vellum to the cardstock and create the box or square shape. 


Thank you so much for checking out my use for vellum. Now, head on over to 

 Melissa Robinson's blog to see her spin on vellum. 


2/06/2018

Pop up Punny Pals

Hello Crafty Peeps and Welcome back to DanYell Scraps!!! :)

Today I am going to show you how to create a trifold card where the images from the inside can be seen on the outside! This is C.A.S.E. from the talented Jennifer McGuire.


Today's card is featuring the super cute, Operation Smile™: Punny Pals. I want to take a moment to talk about this set....this stamps brings smiles to childrean around the world. When you purchase this stamp set, CTMH will donate $7 USD of the proceeds to Operation Smile™, a non-profit organization that provides surgeries to repair cleft lips and palates for children around the world. You can read more about Operation Smile and what it stands for here --> OPERATION SMILE™

To recreate this card exactly you will need the coordinating thincut set for the above stamp set. These are marked as going soon, and won't be around much longer. 


I am a dog lover, so I choose to use the puppy for this Valentine's Day themed card! 


I found this to be a very simple card to create, and the best part, no waste! So for all you frugal card maker's this one is for you! 
Starting with an A2, or 4.25 x 5.5 inch card base, using the coordinating thincut for the puppy, I cut (on the front panel only) three puppies. 
Using the three cut outs, I stamped my puppy image on each one, and used my ShinHan markers, Clay, Mahogany, and Pastel Peach to create the different shades of brown on each puppy. I fussy cut the white board off of each puppy. 


For the front of the card, I stamped "you make my heart happy" from the Happy Heart stamp set A1192, in versamark ink, and added black embossing powder. Because Black embossing powder is not very forgiving, little specks (yes i used a static tool hehehe) were everywhere. That encouraged me to work with this little curve ball. I grabbed mt colored pencils, and a water-brush, and flicked "paint" splatters over the front. Side note, the card front was open so the splatter did not get on the inside from the three openings I created in the beginning. 
From the same stamp set, two hearts were added. Each was stamped in the Color of the Year Bashful pigment ink, and heat embossed in clear embossing powder. I actually waited for them to cool/dry, and stamped and added clear embossing powder two more times. It gave such a nice raised glossy image. Reminded me of those puffy stickers from when I was a kid. 


So for the inside, remember when I told I fussy cut the white away from the image in the beginning? Here is why, I will close my card, and add my puppy to the inside using the those "windows" as guides. If I left the white board around the puppies, the card would never open and close without catching on the images. I centered each image in the window, and added 3D foam tape to the back of each one, so when the card is closed they are popped up through the front of the card. 

Stay tuned for more punny pal cards! Below are the supplies and links for those supplies. I am compensated with a small commission when you purchase from those links. THANK YOU for your support! 

SUPPLIES: 


Until next time! Stay Crafty Peeps! :)

2/03/2018

SOTM: Sunny Thoughts + Pretty in Pink Cards

Welcome back Crafty Peeps! 

Today I am sharing with you how to take the new February Stamp of The Month set "Sunny Thoughts" and create three stunning cards, and a layout. Something for everyone!


(All supplies are linked below to my online store with Close to My Heart. At no additional cost to you, I do receive a small commission when items from my online store are purchased. THANK YOU!)

Today's cards are super cute, and each involve some simple stamping, that can be taken to the next level easily when you are ready. 


This raised card is so simple, and I really enjoy simple cards. With the sentiment being loud, I needed simple reserved accent stamping and pieces to help coordinate the card. Linen ink coordinates well with white daisy, as subtle background. I used the vine image and carried it just past the halfway mark of the card base. The heather cardstock piece was stamped in heather ink using the dotted line image, for a slightly more dramatic subtle background. I love tone on tone stamping. To take this up a notch, you can stamp in versamark ink, add clear embossing powder and heat emboss. This gives a bold tone on tone look, along with the look of dimension.


Building the card up from subtle to eye-catching, I started with the Color of the Year - BASHFUL - as the base accent piece. Because there is the vine stamping next to the bashful cardstock, it was best to leave this as is, with no stamping. Layered on top bashful, is the tone on tone heather card stock, with banner style cut (retired) Hollyhock cardstock, and a banner style cut tangerine cardstock layered on top of both. I have to say that fussy cutting was the bane of stamping for me. (time*out what is fussy cutting? It is when you cut out a stamped image, either leaving a border or no boarder around the image) Until I learned to turn my paper as cut, and NOT my scissors. While I am no master of fussy cutting (#thincutsforallimages) it isn't as cumbersome to me now. I fussy cut the foliage accents after stamping in Juniper ink on white daisy cardstock and tucked a portion of bottom foliage piece behind the sentiment. The small flower image, comes with some foliage behind hit, I just cut that area off when fussy cutting. The flower is stamped in Blossom ink, second generation stamping, giving two shades from ink pad. The sentiment is from the new Sunny thoughts stamp set, 'Have a Sunny day' PERFECT pick me up card! This is adhered to a dove tail banner popped up on 3D foam tape. Two pearls were added to help keep the eye in towards the sentiment. 


This is such a fun card! I have the perfect person in mind to send this to, she is always sunny and fun, and full of life. This cut is actually from the Artbooking CTMH cricut collection. It was resized to fit an A2 notecard. Cut from tangerine cardstock, I tried many different cards before settling on this style. Simple was better in this case. The center of the sun is simply stamped in versa mark ink, with black embossing powder added. I feel like a simple black stamped image would have been to subtle, and this embossed sentiment is just the right amount of ah-ha. 


 The back ground was a combo of stamping; we have that tone on tone again, blossom ink on hollyhock (retired) cardstock. I've also added some embossed stamping. Using some versamark ink and white embossing powder. The end result is perfect. dramatic effect. (tip - when embossing use a static tool before stamping, this helps the embossing powder stick to just the ink and fall off the rest of the card) 


That Bashful cardstock is so pretty, and must see in person kind of paper. Very similar to the first card, I have used the vine image to create a background. I wanted a more dramatic look, so I heat embossed with white emossing powder after stamping in versamark ink. Above the Bashful cardstock, the dot lined images was used again, this time in heather ink. 

Adding plain peacock and heather cardstock on top of the heat embossed Bashful cardstock, is perfect to strengthen the dramatic effect of the embossing. Topping off this layering tip is a dove tail banner cut hollyhock (retired) cardstock piece. "Wishing you warm birthday wishes" is stamped in two colors, even though it is one stamp. Now, I could simply cut the image to create two stamps, which would also allow me to stamp in two different colors effortlessly. However, I love the look of how the blank in bleeds into the peacock at the top of most of the letters. (Did you know you can cut your stamps apart and it doesn't effect their stamping ability? Simply cut between the images (never the raised area) and viola you have two stamps now) To finish off the card, two pearls were added, keeping the eye in focus of the sentiment. 

Supplies: From the Pretty in Pink Collection


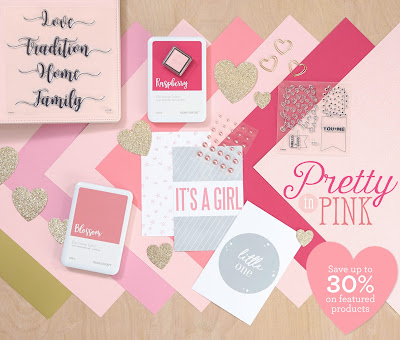
Think pink this month during our Pretty in Pink special! We’ve selected a handful of pink and gold items to offer at a discount during the month of February. This includes multiple products featuring our Color of the Year, Bashful. We’ve even assembled a bundle of Bashful items that you can buy at 30% off or receive FREE by signing up as a Consultant or hosting a qualifying party this month.
Save 30% on product bundles and 25% on individual items

Stamp of The Month: Sunny Thoughts


Get this D-size Stamp of the Month set for a deal with a minimum qualifying purchase! Add the stamp set to your cart on this page at full retail price or, with your qualifying order, add it at checkout for the promotional price.

Item Number: S1802 Set of 13
Recommended My Acrylix® block:
1" × 1" (Y1000), 2" × 2" (Y1003), 1" × 6½" (Y1005), 3" × 3" (Y1006), 2" × 6½" (Y1010)

Stamp images outlined in blue coordinate with the Basic Circle Thin Cuts (Z3318), sold separately.

Odds & Ends...

3D foam tape
Artbooking Cricut Cartridge

Thank you SO much for stopping by today to see my beautiful cards! I hope this inspires you to get crafty!

Danielle