12/10/2015

La Vie En Rose Cardmaking Workshop

Hello Papercrafters!

Calling all my Card makers out there....here is the most adorable set of cards, just in time for those sweeties in your life. 

The cards from the La Vie En Rose cardmaking workshop will have you seeing life through rose-colored glasses! 


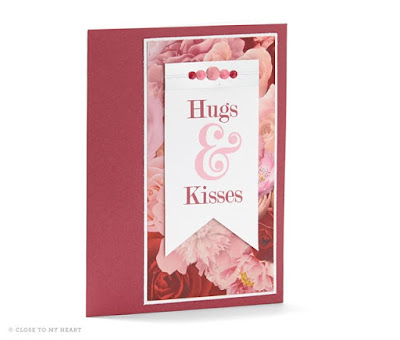
5 1/2" x 4 1/4" HUGS & KISSES CARD

51/2" x 41/4" MR. & MRS. CARD
Use the color photos, card patterns, and cutting diagrams along with the materials list and assembly tips to create your own cards (5 each of 2 designs) during my Card WorkShop January 10th 2016. 

Work Shop Kit contents:
Pre-Stamped images using the (C1621) My Acrylix® Mr. & Mrs. 

La Vie En Rose B&T Duos™ Bulk Pack  1 Sheet
X5780 Pomegranate Cardstock  2 Sheets
X5779 Poppy Cardstock  2 Sheets
1385 White Daisy Cardstock 2 Sheets
Z3091 Pink Enamel Gems 1 Pack
Z3130 Foil Tape Silver 1 Pack
X254 White Cards & Envelopes Value Pack 10 Cards & Envelopes
Cutting/assembly guide.

Orders should be placed by 12/30/15 to me directly via email. Danyell81@live.com - Please use LaVie En Rose Card Workshop as your subject line. I will send you an Invoice via Paypal. 

Workshop attendees $15.00 
Workshop Kits: $15.00 plus shipping. Will be shipped after 1/10/15

La Vie En Rose Scrapbooking Workshop - January 2016

Hello Paper Crafters!


It has been a little bit since I have posted,  I have been running around crazy busy with kid activities...
I took on the Cub Master Role for my sons cub scouts pack, and let me tell you, that is super fun. But, I have to say I have missed out on scrapbooking time and blogging my workshops etc. 

But, we all need to take a moment for family, right!

With out further ado, I am super excited to show off January's Scrapbooking workshop, being held on 1-17-2016.

La Vie En Rose...

La Vie En Rose Layout 1 with  the Cricut shapes

  • GETTING STARTED

    Use the materials and instructional guide included in the Workshops on the Go® La Vie En Rose scrapbooking kit (G1100) in addition to basic papercrafting supplies, such as inks, My Acrylix® blocks, and the Cricut® Artistry collection, to complete this layout.  To purchase the kit and other papercrafting supplies, please contact me.

    ALTERNATIVE LAYOUT

    The workshop guide illustrates how to complete the layout with various Cricut®-cut shapes. If you don’t have a Cricut® Artbooking cartridge, you can create the non-Cricut version of the layout, noting the minor differences and following the alternate cutting dimensions suggested in the Need to Know section of the instructional brochure.
La Vie En Rose Layout 1 Without using the Circut

Workshop Kit

ITEM #PRODUCT
COST
G1100Workshops on the Go® La Vie En Rose Kit (includes):
La Vie En Rose Paper Packet
My Acrylix® La Vie En Rose Scrapbooking Workshop Stamp Set
White Daisy Cardstock (1 sheet)
Peacock Cardstock (1 sheet)
Fern Cardstock (1 sheet)
La Vie En Rose Assortment
Gold Foil Tape
Instructional Brochure
$29.95

Approx. Retail Value:
$44.00

You Pay:
$29.95

Additonal Supplies

ITEM #PRODUCT
COST
Z2650Fern Exclusive Inks™ Pad
$6.95
Z2649Peacock Exclusive Inks™ Pad
$6.95
Z2653Pomegranate Exclusive Inks™ Pad
$6.95
Z2652Poppy Leaf Exclusive Inks™ Pad
$6.95
Z2060Thin 3-D Foam Tape
$5.95
Z1979Marvy® Uchida® LePen™ Black Journaling Pen
$3.25
Z19991" Circle Punch
$9.95
Y10001" × 1" My Acrylix® Block
$3.95
Y10021" × 3½" My Acrylix® Block
$5.95
Y10032" × 2" My Acrylix® Block
$6.50
Y10092" × 3½" My Acrylix® Block
$7.50
Z3167Cricut® Artistry Collection
$99.00


La Vie En Rose Layout 2
    • GETTING STARTED

      If you attended a La Vie En Rose scrapbooking workshop, you’ll already have the necessary products required to create the additional layout.
      If you haven’t attended a workshop and would like to create the artwork shown here, contact me.
      Materials Needed
      1. Workshops on the Go® La Vie En Rose Scrapbooking Kit (includes):
      2. La Vie En Rose Paper Packet
      3. My Acrylix® La Vie En Rose Scrapbooking Workshop Stamp Set
      4. Fern Cardstock (1 sheet)
      5. Peacock Cardstock (1 sheet)
      6. White Daisy Cardstock (1 sheet)
      7. La Vie En Rose Assortment
      8. Gold Foil Tape
      9. Instructional Brochure
      Required Tools
      1. Fern Exclusive Inks™ Pad
      2. Peacock Exclusive Inks™ Pad
      3. Pomegranate Exclusive Inks™ Pad
      4. Poppy Exclusive Inks™ Pad
      5. Thin 3-D Foam Tape
      6. Marvy® Uchida® LePen™ Journaling Pen
      7. 1" Circle Punch
      8. 1" × 1" My Acrylix® Block
      9. 1" × 3½" My Acrylix® Block
      10. 2" × 2" My Acrylix® Block
      11. 2" × 3½" My Acrylix® Block
      12. Cricut® Artistry Collection

      HELPFUL HINTS

      To create the additional layout, follow the helpful hints outlined below.
      • Use information on page 47 of Reflections™ and this cutting guide to cut papers
      • Using Poppy ink, stamp flower image repeatedly across ½" × 12" Poppy cardstock strips
      • Affix gold foil tape above ½" × 12" Poppy cardstock strips
      • Using Poppy ink, stamp dotted image repeatedly above gold foil tape
      • Using Fern ink, stamp “My Heart Is Full” sentiment on left page base to the left of the 8¼" × 6¼" Poppy cardstock photo mat; using Poppy ink, stamp arrow image beneath sentiment
      • Using Poppy ink, stamp “You Are Simply Amazing” sentiment on scrap White Daisy cardstock, trim, and adhere to left corner of the 8¼" × 6¼" Poppy cardstock photo mat, using thin 3-D foam tape if desired
      • Using Fern ink, repeatedly stamp flower image across 4¼" × 3" Journaling Mat
      • Using Fern ink, stamp “Hello” sentiment on upper right corner of right page, above the 4¼" × 3¼" Poppy cardstock photo mats
      • Add journaling and embellish layout, using assortment as desired


    • Are you a beginners? No Problem, for $10.00 I will cut all of your papers, then move on to create all of their accents together at the workshop! Payable at the workshop.

    • Are your advanced? No problem, work at your own pace, and you can use my tips and tricks at the beginning of the workshop when you want or need to.


Order your Kit and any additional supplies you don't have on hand:   http://danyellwagner.ctmh.com/Default.aspx

Allow two weeks for your kit to be processed and shipped to your home, Order no later than 12/31/2015 so you have it in time for the workshop on 1/17/2015

BONUS - Everyone that attends/ orders my workshop will make this super cute 3x3 card FREE
Out of Town/State/prior obligations. No Problem...here are your options:

1. Need your kit precut and Cricut shapes add $15.00 and order through me via pay-pal. I will send your pre-cut kit and Cricut shapes, along with the cutting guide for layout# 2 and the kit to make the Free Card....via USPS after the workshop.

2. Seasoned Pro, and you can cut your layouts, cricut cuts....order directly from my website. Once your order is processed, I will email you the cutting guide to make layout #2 and the Free Card.

Happy Scrapping everyone, thanks for looking!
I can't wait to meet up and work on these layouts with you. 

11/01/2015

Simply Fundamental Scrapbooking workshop


Experience the beautiful Simply Fundamental Scrapbooking workshop—available only during November! This workshop has been created using all the items featured in our campaign exclusive My Legacy™ album bundles, available during November for $71.80 each!

When you purchase the album bundle, you will also qualify to receive a value pack of side load or top load Memory Protectors™ FREE—a savings of $19.95!

There are 10 bundles to choose from you and you are able to order as many bundles as you'd like.
Check out all 10 bundles here> Simply fundamental Bundles 

Along with the album style and design of your choice, each bundle includes one Paper Fundamentals Enchantment pack, one Fundamental stickers Enchantment pack, one Peacock Fundamental assortment, and three sheets of White Daisy cardstock.

You will then be set to turn these beautiful products into fabulous layouts using the new Simply Fundamental Scrapbooking workshop featuring five layouts you can make using all the supplies in your bundle.
 Here is a sample of the layouts you can make.


Contact me for more details.

*Offer valid November 1, 2015 (9:00 am MST)–November 30, 2015 (11:59 pm MST) while supplies last. No tax will be charged on the free items. Shipping/handling rates are based on the full retail price of any free items, including the sheets of White Daisy cardstock (three sheets: $1.19 USD / $1.41 CAD).

9/01/2015

Tip Tuesday - Scraps, and Cards

HELLO Everyone!

If you follow my Facebook Page you'll know that I started a Tip Tuesday post. In my little local Facebook group of crafty friends, we have been doing this for sometime now...I thought um I need to bring it over here to the blog and my business page...so here it goes. You may already know this, do this, or have no idea how. So lets get started. 

Last week i made all of those layouts using the new Zoe Paper packet. I have some scraps left over...When you have scraps left over from a layout or what not, use them to make a super easy 3x3 note card such as the sunburst card.
  •  I used small rectangle scraps and cut them at an angle from one corner to the opposite corner.I then arranged them on my card until i found a pattern I liked. Starting in the center and working my around on either side. You will have hang off, just cut that off after you are finished adhering. 
  • I eyeballed (i am not really a ruler kind of girl) the size i would need in white card stock to stamp my sentiment on, and adhered to the bottom of the card. 


  • I used a 1 in circle punch stamped a sun image on it in a coordinating color, cut it in half and adhered it in the center. Blah to plain, I cut a sequin in half and added that to the center for a little bling. 
  • Last, I added some twine to cover the seam of the star burst and white daisy. 
  • Inside I stamped Happy Birthday. 
my second card I used two pieces of scrap. I distressed by white daisy added some doodling and now it is ready to be included with my next gift. 

For more inspiration on the starburst cards - check out this link to Pinterest: https://www.pinterest.com/msdaisy…/cards-sunburst-technique/

Happy Scrapping
Thanks for stoping by
Danielle. 

8/26/2015

All-Purpose Mat Tips & Tricks By CTMH on My Craft Channel.

Hello My Crafty Friends!

Item highlight of this week, is the All-Purpose Mat! 


I was constantly, cleaning my work surface, more like scrubbing it with more elbow grease then my pots and pans, to get my glue, ink and what ever else is stuck on there off. Then I came across this neat little, 15 x 20 non stick mat. I am not sure why this wasn't in my craft room sooner, but now that it is....i am thinking wow won't this be great for my kids to use when they are crafting, eating, brushing their teeth, or what ever messy activity they are doing?!?! Seriously, I have thought that. :) 

So this past Monday on My Craft Channel CTMH was shinning bright with a really awesome video talking about a variety of uses for this ALL Purpose mat. If you want to watch it Click here --https://goo.gl/f77kKf


Some Key points on this must have tool:

  • Wipes clean easily, 
  • heat resistant up to 240° Fahrenheit, 
  • non-slip underside for work surface grip.


Some ideas on other uses:

  • Water look
  • Kissing
  • Paint Drops
  • Paint Pallet
  • Marble Effect
  • Base for creating embellishments
Water Look

This gives a nice soft background. Ink your mat (the more ink the better for color) add water with your spray pen (Z1380 set of 3) press your card into your mat. 

Kissing
Apply ink to your mat, spray with water using your spray pen. Press your stamp (solid image works best) into the ink on your mat. Apply inked stamp to your project. With this, a little bit of water goes along way. You can see this in the balloon on the image below.


Paint Drop Bubbles:
Apply your ink to your mat, spray with water using your spray pen. Using your paint brush set (Z3188) pick up the ink water mixture. Let it drop on your project. Allow this to dry completely. Add some Liquid glass to the paint drops (Z679). You now have a bubble effect on your paint drops.You can see these next to the balloons in the image below.


Marble Effect
Very similar to your water color look, however you are just going lightly lay your project on to the ink water mixture and remove quickly. Using your craft heater (Z555) heat your project for that marble effect. This works great on die cut images from your cricut. you can see this on the card stock behind the friends sentiment. 


Base for creating embellishments:
Using your liquid glass make drops as big or as little as you like. When they are dry, you pop/peel them off to create your own embellishments. You can add ink these to give them some character. 
Try your hand at titles or names with the liquid glass, when dry peel off and add to your project. 

Paint Pallet:
Add ink and water to your mat, then using your paint brush set, color in detailed stamped images to get that watercolor painting feel. You can see this in the flowers and dragon of the image below. 


To purchase your mat, and or any of the other amazing tools in this info guide, please stop by my website --> http://danyellwagner.ctmh.com/retail/category.aspx 

Be sure to like and follow My Craft Channel on Facebook every Monday to see more CTMH Tips, Products and techniques. 

Thank you for checking things out. 
Danielle. 

8/25/2015

Let the Fun begin....


W.O.W. This the only word to sum up this paper packet. I received this in the mail and could not get over the colors. Perfect for my baby layouts, my toddler layouts and my big kid layouts....This is what I came up with...

Little Toes Layout: 
CTMH Cricut Artbooking Pre-designed Layout. Zoe Paper Pack.
For the Cut frames and title, I used the Zoe B&T paper. The Base is Glacier Cardstock and the boarder is white Daisy Card Stock. The Embellishments are from the Zoe Compliments set. The top border is the zip strip from the B&T paper, complimented with pre-cut vellum cut outs, from the Zoe compliments packet. 

Here I used the sorbet Cardstock, the Zoe B&T for the Banner cut and the Title cut. From the Zoe Compliments I used the vellum stars in the lower right hand corner. 


Hello Sunshine Layout!


I added some Glacier twine to the photo mat. For the title I used two stamp sets. The Sentiment is from Rain or Shine (D1634) and the back ground is from Brushstrokes (C1608) in Canary...the heart is stamped three times and is from Doodle Designs (A1170) I added a journal box from the Zoe Compliments package. 
The right side, I add just a bit of the Glacier twine to pull the design from the left page over. I added the numbers 1 - 4 to the 3x3 picture mats (found in the Zoe Compliments package) and later used the Journal Box from the left page to write about those. I doodled with my Marvy® Uchida® LePen™ Journaling Pen around the photo mats, for so much needed character. I am really happy with them.  

ME & YOU Layout.


I dig a little into my stamping how to and use some masking techniques to give these layout some flair. For the Love your More, I stamped Love in Sorbet ink, and you more in Slate. The arrow is also stamped in slate. For that flair, you will see some sequins in the lower left & upper right hand corners. 


I used Documenting Moments stamp (D1647) set for both pages. Some fussy cutting and inks used are canary, sorbet, glacier and slate. I added a zip strip from the B&T to compliment the pages theme. Lots of sequins. 

Some more mask stamping and embellished banners to compliment the Banner from the Zoe Compliments package. 

Thank you for looking, I hope I  have inspired you to get some papercrafting done! 

Here are list of supplies I used, click on the link to order that item directly from web site. When you order the Zoe paper pack and Zoe compliments, I will send you the gutting guides for the Hello Sunshine and Me & You layouts for free. Just simply email me at DanYell81@live.com Subject Line Zoe Layouts with your order confirmation#. 
Thank you! 

Find the You & me Layout on Ebay


Glacier Ink Z2641

8/05/2015

Hello Zoe!

Introducing the Zoe Cardmaking Workshop!
The cards from the Zoe cardmaking workshop are perfect for sending a smile across the miles and letting someone know you care.
You will use the color photos, card patterns, and cutting diagrams along with the materials list and assembly tips to create your own cards (5 each of 2 designs).

Workshop will be held at my Home Studio on 8/30/15 from 2pm - 4 pm


You kit will include the following items precut:

BULK369 Zoe B&T Duos™ Bulk Pack 2 Sheets

X5770 Glacier Cardstock 1 Sheet
1385 White Daisy Cardstock 1 Sheet
Z3089 Grey Enamel Gems 1 pack
Z3086 Aqua Shimmer Trim 1 Pack
Z2060 Thin 3-D Foam Tape (12.5 ft)
X254 White Cards & Envelopes Value Pack 10 Cards & Envelopes
Instructions.

You will have unlimited use of the following items to complete your cards during the workshop:

C1619 My Acrylix® So Many Smiles 
Z2641 Glacier Exclusive Inks™ Pad 
Z2173 Slate Exclusive Inks™ Pad 
Z2164 Sorbet Exclusive Inks™ Pad 
Y1000 1" μ 1" My Acrylix® Block 
Y1002 1" μ 3½" My Acrylix® Block
Y1003 2" μ 2" My Acrylix® Block 
Y1006 3" μ 3" My Acrylix® Block


Each Kit is $21.80 
Please RSVP by 8/14/15 to Danyell81@live.com 
Subject:  Zoe Workshop
Payments will be made via Paypal, please provide your Paypal address, the number of kits you want. 

Out of Town, or can't make the workshop, No problem i can mail you your pre-cut pre-stamped kit. 
$23.80
Please Email your order to DanYell81@live.com
Subject: Zoe Workshop to go
Payments will be made via Paypal, please provide your Paypal address and the number of kits you want. 

Want the kit, and the stamp set, No problem, I can mail you, a pre-cut kit with a new stamp set C1619 My Acrylix® So Many Smiles 
$36.77
Please email your order to Danyell81@live.com
Subject: Zoe Workshop to go With Stamp set
Payments will be made via Paypal, please provide your Paypal address and the number of kits you want. 

You can follow me on Facebook: https://www.facebook.com/DanYellWagnerctmh
You can Shop any time with me: http://danyellwagner.ctmh.com/Default.aspx

Have a wonderful day. Thank you so much for looking and supporting.