If you haven't guessed it yet, that is exactly what the December Stamp of The Month is featuring. Cute little images with adorable and some real laugh out loud sentiments. Look how cute these are...
Today I am going to show you just how I created quick and easy slider cards use the December SOTM and a design space file.
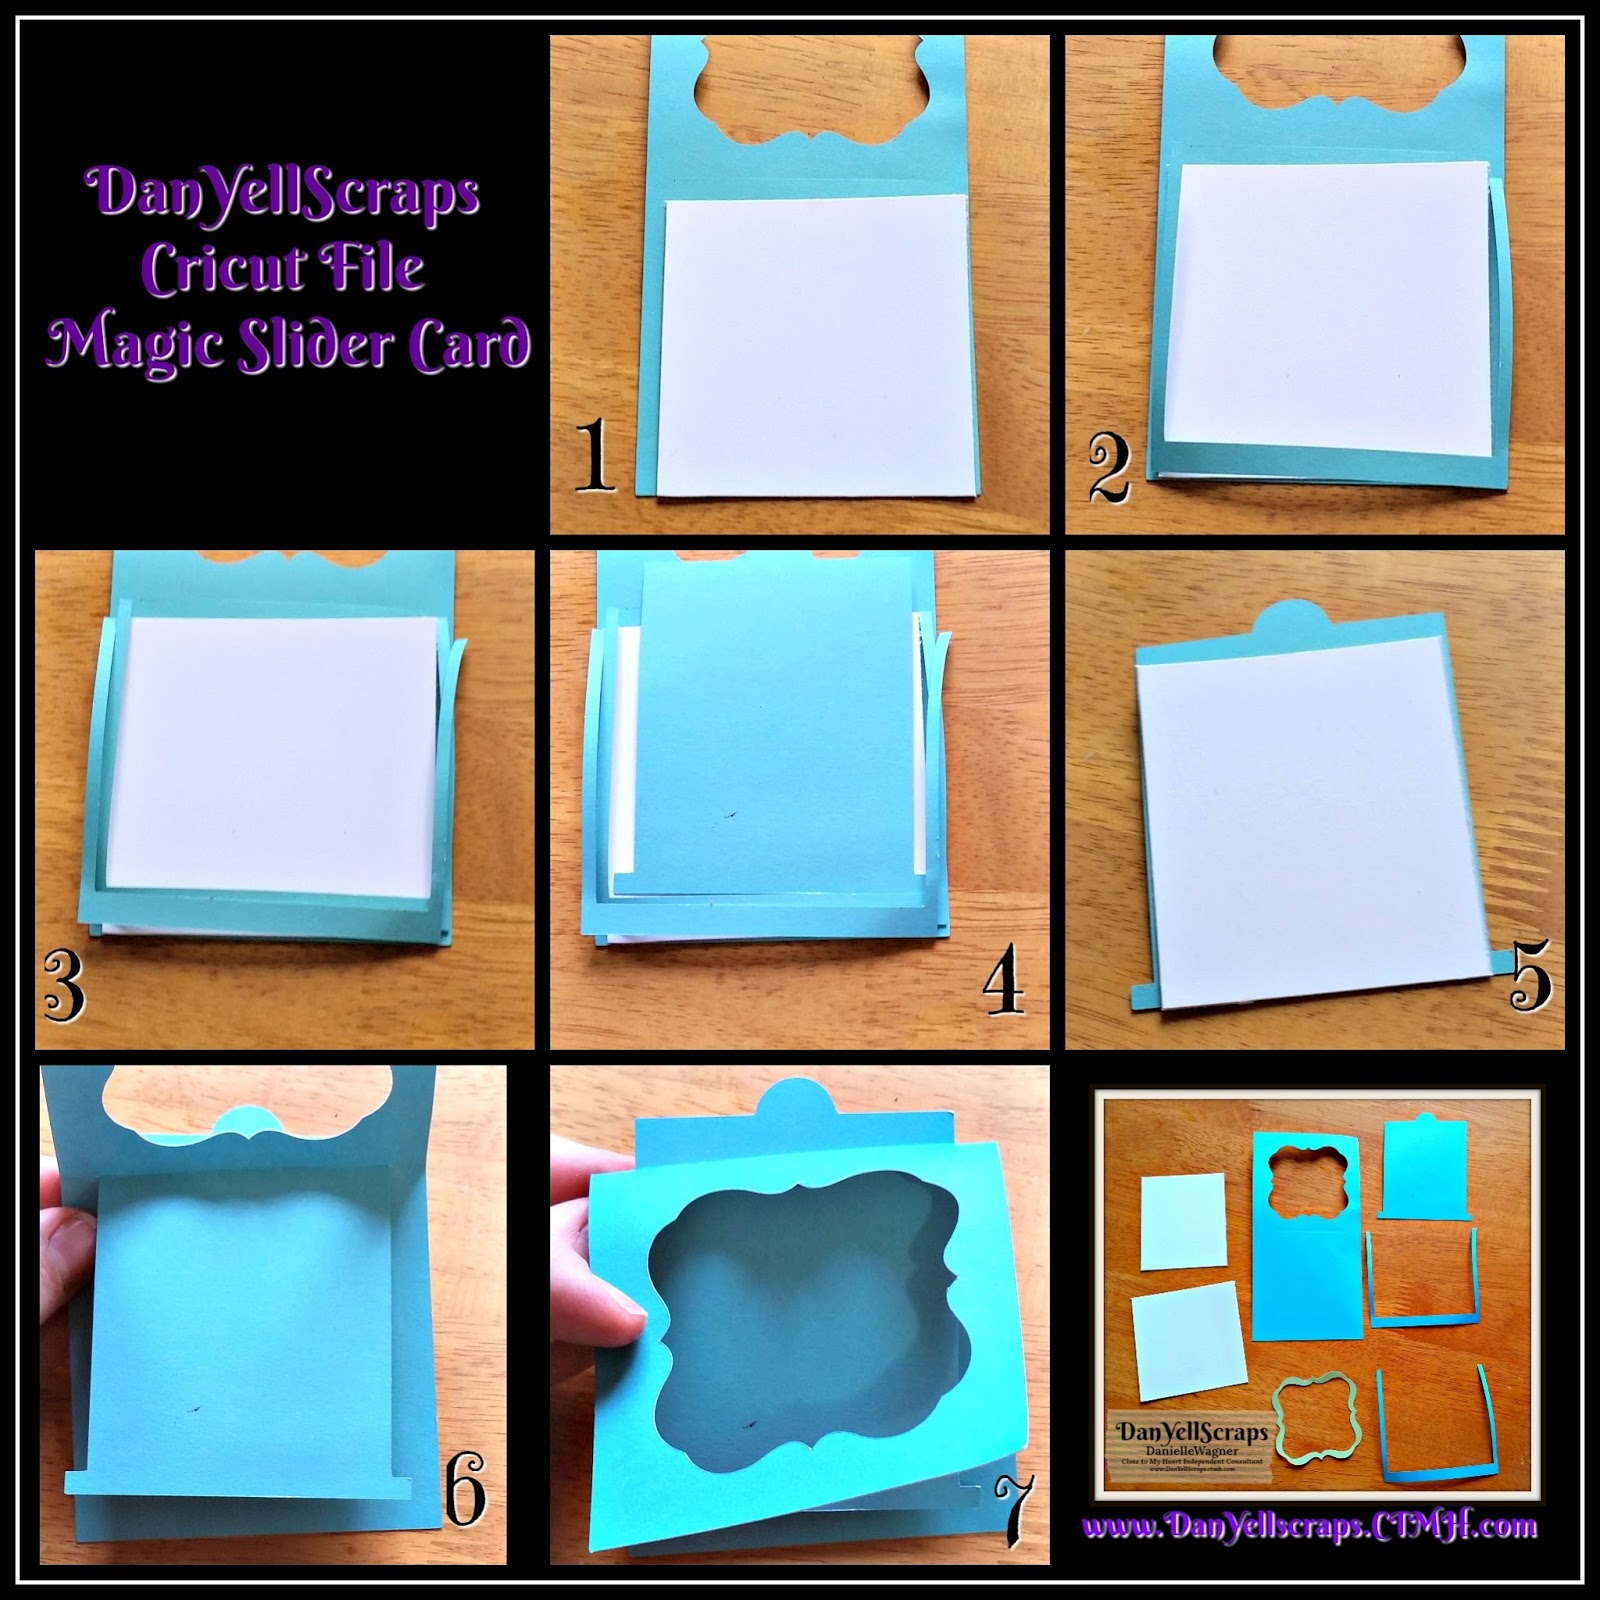
Lets start with the basic assembly:
In the lower right hand corner, you can see the pieces I will be working with after the file has been cut. The 3" x 6" white daisy cardstock is cut to create two bases. 3" x 3" and 2.5' x 3"
Adhere the 3" x 3" white daisy to the base of your card. I would at this point stamp create my base images now. I could have done this prior, its really personal preference.
The file cuts two "U" shaped pieces. These are the guides for the slider. Adhere the the first one down, with STRONG adhesive making sure the side and bottom are lined up exactly.
Add the second directly on top, again making sure the sides and bottom are lined up exactly.
Add the slider and test to make sure the guides are placed correctly.
Add the optional 2nd white daisy base to the slider. Again, I would create my slider images and or sentiments now. Personal preference, as there is no right or wrong way to do do this.
Add the Acetate piece to your window. I would at this point stamp any images that would need to line up with my bases images (not the slider images) in Staze on ink on the acetate.
Line up the slider through the sliced opening, and add STRONG adhesive to the top of the guides, careful not to add adhesive to the slider. Close the slider.
Here is a finished Slider using the December Stamp of The Month Smore image.
How'd She Do That ⇭😮
The S'more image was stamped twice, once on my 3" x 3" white daisy base in versa mark ink and heat embossed with fine black embossing powder. Then stamped on the acetate 3" x 3" window. The S'more image was colored in with watercolored pencils. When done lightly, I found the White Daisy holds up well to watercoloring. A window boarder was added to the top of the acetate. The sentiment "I need S'more" was stamped on Black cardstock, in versa mark ink, and heat embossed with fine white embossing powder. A small notch was cut from one end of the piece to create a banner. 3D tape was added to the back to give dimension. The Card was finished off with some old heart enamels, then layered on a 3.25" x 3.25" sweet leaf cardstock and then again on a 3.5" x 3.5" pewter cardstock. Using a hold punch, the slider was then given a tassel with twine.
I had so much fun creating these cards, So I am offering the design space file FREE to all my customers who purchase the December SOTM OR the Operation Smile™: Punny Pals D1751
Once your order is confirmed I will send you the link via email to create your own slider cards.
Here are the Supplies used in this tutorial!
1 design space file created by DanYellScraps (file will cute two cards, per sheet, with creative placement on your part)
Hello and welcome back to DanYellScraps! Today I have a lovely set of cards, using stamp layering and only one color of waterbased -dye ink. I really think you will run to the craft room with this simple and fun way of stamp layering. For today's technique we will be using two close to my heart stamp sets. White Daisy card stock, Vellum sheets, Waterbased dye ink in pacifica, pomegranate, willow and lemon, versa mark ink, clear embossing powder, extra fine white embossing powder, an embossing folder, and Thin cuts.
Full Tutorial Below on DanYellScraps YouTube Channel or Scroll on down for a pictorial. (enjoy)
The first stamp set is the lovely Beautiful You Stamp + Thin cuts set. This My Acrylix® Set offers 22 Stamp images. You'll notice a blue outline on the picture, this shows the stamps coordinate with Thin Cuts metal dies. Thin Cuts are packaged on their own magnetic sheet and work well with most die-cutting machines.
The secret to achieving the layered look with ONE color of ink, is vellum paper. The 3 pack of vellum paper from CTMH worked like a charm with this technique. I used pieces cut down to 3" x 12". I also used White daisy card stock. Each white daisy cardstock is cut to 4.25" x 5.5. Now this was probably more room then what I needed, but at the end of the day I can use the scraps on other small fussy cutting projects, so it wasn't a big deal at all.
I am using my new stamp platform, because it is brand new for me. However, using this style of stamp layering, there really is no need for one, and your blocks will work just fine.
I am starting with Pacifica Single-color, water-based, dye ink stamp pad. Inking up the largest, most solid stamp. A simple tap tap, twist twist, tap tap motion ensures that I have thoroughly covered the stamp with ink. I will repeat this process with the same image in Lemon, and pomegranate single-color, water-based, dye ink stamp pads, cleaning my stamp between color changes. The leaves will also be stamped in willow on the White Daisy cardstock. (not pictured)
Switching out my White Daisy cardstock for vellum, I will be stamping the layering stamps. I will put BOTH on my stamp positioner at the same time on the Vellum sheet. Before stamping I will cover the surface of my vellum with some baby cornstarch powder. There are tools out there you can purchase for this - however my DIY version works great for me. This quick step helps keep the embossing powder to your stamped image, reducing or eliminating the embossing powder from melting your image or words into one big blob.
Since the waterbased dye ink sits on top of the vellum, I am able to quickly add my CLEAR embossing powder and heat emboss this. Tip, to help your paper, especially vellum, from warping during heat embossing, make sure your heat gun is HOT. During the entire stamping process, my heat gun is heating up. I will repeat this process for the Pomegranate and Pacifica waterbased dye ink. I will also stamp the leaves outlines in willow on the vellum and heat emboss them as well.
Next you will want to cut your around your images (from the vellum sheet) in a manner that leaves enough space for the Thin cut. Off camera I fix the pomegranate, as I stamped it to close to the pacifica rose, not allowing enough space for the die cut. You will see what I mean as we move along.
This is the fun part, layering the images! I am using my Bonding Memories™ Dual Action Glue Pen to adhere the vellum cut outs to the White Daisy cardstock. This all-purpose glue pen with small-tipped applicator is perfect for safely bonding photographs, artwork, and more. It creates both permanent and temporary bonds. I am careful to add this to the back of the stamped areas of the vellum, however some of the adhesive does flow outside of the stamped image area, and because it dries fairly quickly it dries clear. Because this is being layered, it is extremely hard to see any over flow of the adhesive once it is put together.
I am adding my med sized rose image (vellum) to the large rose image (White Daisy base). Because the vellum is see through it is very easy to see where these line up. However I suggest if you are using this set for the first time, that you play with the layers before adding adhesive to get the 'feel' of the layers and their placement. Once I am satisfied with the placement, I will add my small rose image (vellum) to the layers. I will repeat this for each rose I created, along with the leaves.
Once all my layers are in place, I will add my Thincut, and secure it with some washi tape. Because the layers are so thin, this will cut like butter through my cuttlebug.
Here is the final result from the above steps, a layered image with one waterbased ink color! By using the velum and clear embossing powder, it looks as if there were three shades used to create this beautiful rose.
After each image is die cut, I place it under an acrylic block to make sure any potential warping from the heat embossing is removed. I leave all of them under the block while I move on to my next step. Embossing my card back ground.
Using one of my favorite embossing folders from CTMH (retired) I add 4.00" x 5.25" white daisy card stock to the inside. I also know that I would like a flat surface to add my rose to, so I will also add my Circle Diffuser from CTMH. This is a 5 ¼" × 7 ¼" clear plastic embossing diffuser with 2 ½" circle. I place the diffuser, so that the circle off set, and not centered on each card base I created. I am now going to put all of my die cut images with my card bases. I am using 3 leaves and a rose for each card. Using my AGT gun or dry adhesive, I am going to adhere down the leaves to diffused circle area. I will next add adhesive foam dimensional pieces to just the flowers.
Now to work on the card front sentiment. I will be using the super cute CTMH stamp set Short and Sweet Set of 12 stamps. It is recommended to use a block that measures 1"×1" For this particular card, I have actually cut the sentiments apart to use in a line.
I have a need for some get well cards and happy birthday. As I mentioned I have cut the '(soon)' away from 'get well' and, I have cut 'Birthday' away from 'Happy' This in no way alters the performance of the stamp. In reality it brings some versatility to it. I am now able to position the stamp in a line on my 1" × 3 1/2" My Acrylix® Block. When using these blocks, you will noticed and etched line. This is such a helpful guide when stamping with words to help keep them straight. I will be stamping on black card strips. In order for my sentiment to show up, I will use the versa mark ink pad and some ranger extra find white embossing powder. Again making sure my heating tool is nice and hot, I have already turned it on. Because the versa mark dries slowly, there is no need to rush to add powder or heat emboss these, therefore I can complete all of my stamping first then add the white embossing powder. The ends are dove tailed, and 3D foam adhesive is applied to the ends of the sentiment strips. The center will rest on the rose, hence why the 3D foam adhesive was not added to the middle.
I apply dry adhesive to the White Daisy embossed card stock and adhere it to each of my color coordinated card bases. Each card measures 4.25" x 5.50" when closed. The popped up images will mail just fine without extra postage. Here are three cards finished. Off camera, I added Black Glitter Paper behind the sentiment. The Glitter paper from CTMH comes in a set of 3 – 12" × 12" sheets, 1 color per pack, and the best part is, it is cardstock-weight. I also added some sparkly pizzazz to my cards with these small bitty sparkles. (You can get them from CTMH in a pack of 100 adhesive-backed gems, round, 2mm.)
Thank you for stopping by today! Leave a comment below and let me know your thoughts on this nifty trick for layer stamping.
If you are anything like me, your time is valuable. When I sit down to scrapbook, sometimes I have hours to 'play', but more often then not, I have minutes to 'play'! So that means anything that I can get done easily, fast and LOOKS like I spent hours doing it is a win-win for me.
This brings me to the Silver & Gold Workshops your way Kit from CTMH. I normally stretch these and turn the kits into 12 page layout kits. As the holiday approaches, I realized my time for crafting isn't going to allow for me to create another workshop (see my Beary Christmas workshop). I remembered each workshop your way kit, there is a downloadable PDF gutting guide provided....PERFECT!
The guide sets you up to create three 12"x 12" layouts, and the option of 9 cards. I dived right in to create the three layouts. I am constantly keeping up with FIVE scraps, one for each of my children and a family one. So for me I create, pages ahead of time, immediately add them to my books and add pictures once the event happens.
My Beary Christmas workshop - is great for showcasing the events leading up to Christmas, along with a family get-together or two. The Silver and Gold workshop, is just the right size to accent our annual Christmas eve church service. We always dress in our best and enjoy an evening of family togetherness.
In this quick video I show you how easy it is to create three layouts in 5 minutes.
Thank you so much for joining me to day! I hope i have inspired your to try a workshop your way kit, and get those pictures from your phone and or computer to a book!
Here is a list of supplies used in the above video:
The Beary Christmas workshop you've all be waiting for! This is such a fun paper collection. With ONE workshop your way kit, I have crafted for you 12 layouts and Christmas THANK YOU cards. Half the pack makes (12) Scrapbook pages, the other half, you will create (36) thank you cards (12) cards of (3) designs, for those amazing gifts received during the holiday gift giving season. :)
Lets start with the layouts...
Beary Merry Christmas...
Starry Christmas Night.
Tis The Season...
Our Christmas Countdown...
Festive...
Holly Jolly Holiday...
Beary Merry Christmas...
Then there were the cards... (36) Cards, (12) each of the (3) designs shown.
Low down on the show down!
How do you get your very own DanYellScraps Cutting guides? I will send the files and cutting guide via email to my customers ordering the workshop supplies (the supply list is noted below) or purchase $25 products of your choice from my CTMH Shopping Website, or you can purchase the PDF guides (full Color) via this paypal Link: I am really proud of my workshop files! I worked on these days on end and I am so excited to share them with you... The entire set of files include;
Welcome Sheet
Color Cutting Guide
Tips & Tricks Page
Detailed Color Photos of Each of the (12) Scrapbook pages & (36) Cards for assembly assistance.
Fellow Close to My Heart Consultants are also welcome to order these files to use in support of their own business! Yes, this means you can copy/print/distribute these files to your own customers and hold your own events using my designs and files! Please send me a quick email here for the details. Each Full ‘Beary Merry Christmas’ Workshop Kit will require the following products:
Beary Christmas Workshop your way (scrapbooking) Kit Item Number: G1137 $27.95Kit contents:
Circle Punch or Thin Cuts—Basic Circles Z3318 $12.95
Also Remember, joining my CTMH Team gets you unlimited access to my complete files library FOR FREE! I will go to ABOVE and BEYOND to help my team by offering pre-designed workshops and custom cutting guides to help support their own businesses! Use the above shopping list and visit --> DanYellScraps to purchase your supplies. Once your order has been confirmed, I will email you the cutting guides and files.
WAIT - Did you know when you order the DECEMBER special Through the Year, it qualifies you to earn ANY of my cutting guides for FREE?!?!?! Check it out.
THROUGH THE YEAR
Prepare to welcome 2018 with a beautiful, DIY, photo calendar!
As 2017 comes to a close, you can be ready for 2018 by creating a beautiful photo calendar. The Through the Year calendar kit includes everything you need to create a 12-month photo calendar for the year ahead. Save 20% on this exclusive bundle of products, that includes custom gold glitter die-cuts, glitter gems, Complements, papers, and a blank calendar.
The November Stamp of the Month, Through the Year, makes an excellent companion to this project, too. If you didn’t get this limited-time stamp set last month, never fear — you can get a calendar kit that includes this set!
Get this exclusive calendar kit FREE this month when you sign up to become a Consultant in December or when you host a qualifying party. Learn more about becoming a Consultant Learn more about hosting a party
Use the materials in this kit to create a customized 12 month calendar.
Offer available through December 31, 2017, while supplies last.
STAMP OF THE MONTH
December 2017: A Little Bit of Pun
Spend $50 and get this Stamp of the Month set for just $5.Beautiful Stamps, Amazing Discounts
Each month you can purchase a new D-size stamp set, available for one month only, for just $5. When you place an order of $50 or more in Close To My Heart products, you qualify for this special Stamp of the Month pricing. S1712, set of 17 Recommended Blocks: Y1000 • 1″ × 1″ Y1003 • 2″ × 2″
So as you guessed it, there is MORE - When you order OPTION 2 of the Through the Year December Special - you will qualify for not one, but ANY TWO of my workshop cutting guides, and the super cute, December Stamp of The Month for only $5.00!!!!!
With all that said - I have one more thing...last Month I offered a November Stamp of the Month Kit Free when you qualified and purchased the Nov SOTM at that amazing $5.00 price point. Well I have MORE in Stock now and I am offering it again with ANY December Through the Year Calendar Purchase! Yup, All your Free! How cool is that.
Thank you SO MUCH For stopping by! I hope I have inspired you to be creative, preserve your memories and to have fun!